

Start here
Tasks, step by step
On this page
Each task in the app, then on the command line. Examples use the Demo environment, or Lab where a real domain controller is needed.
Try the demo
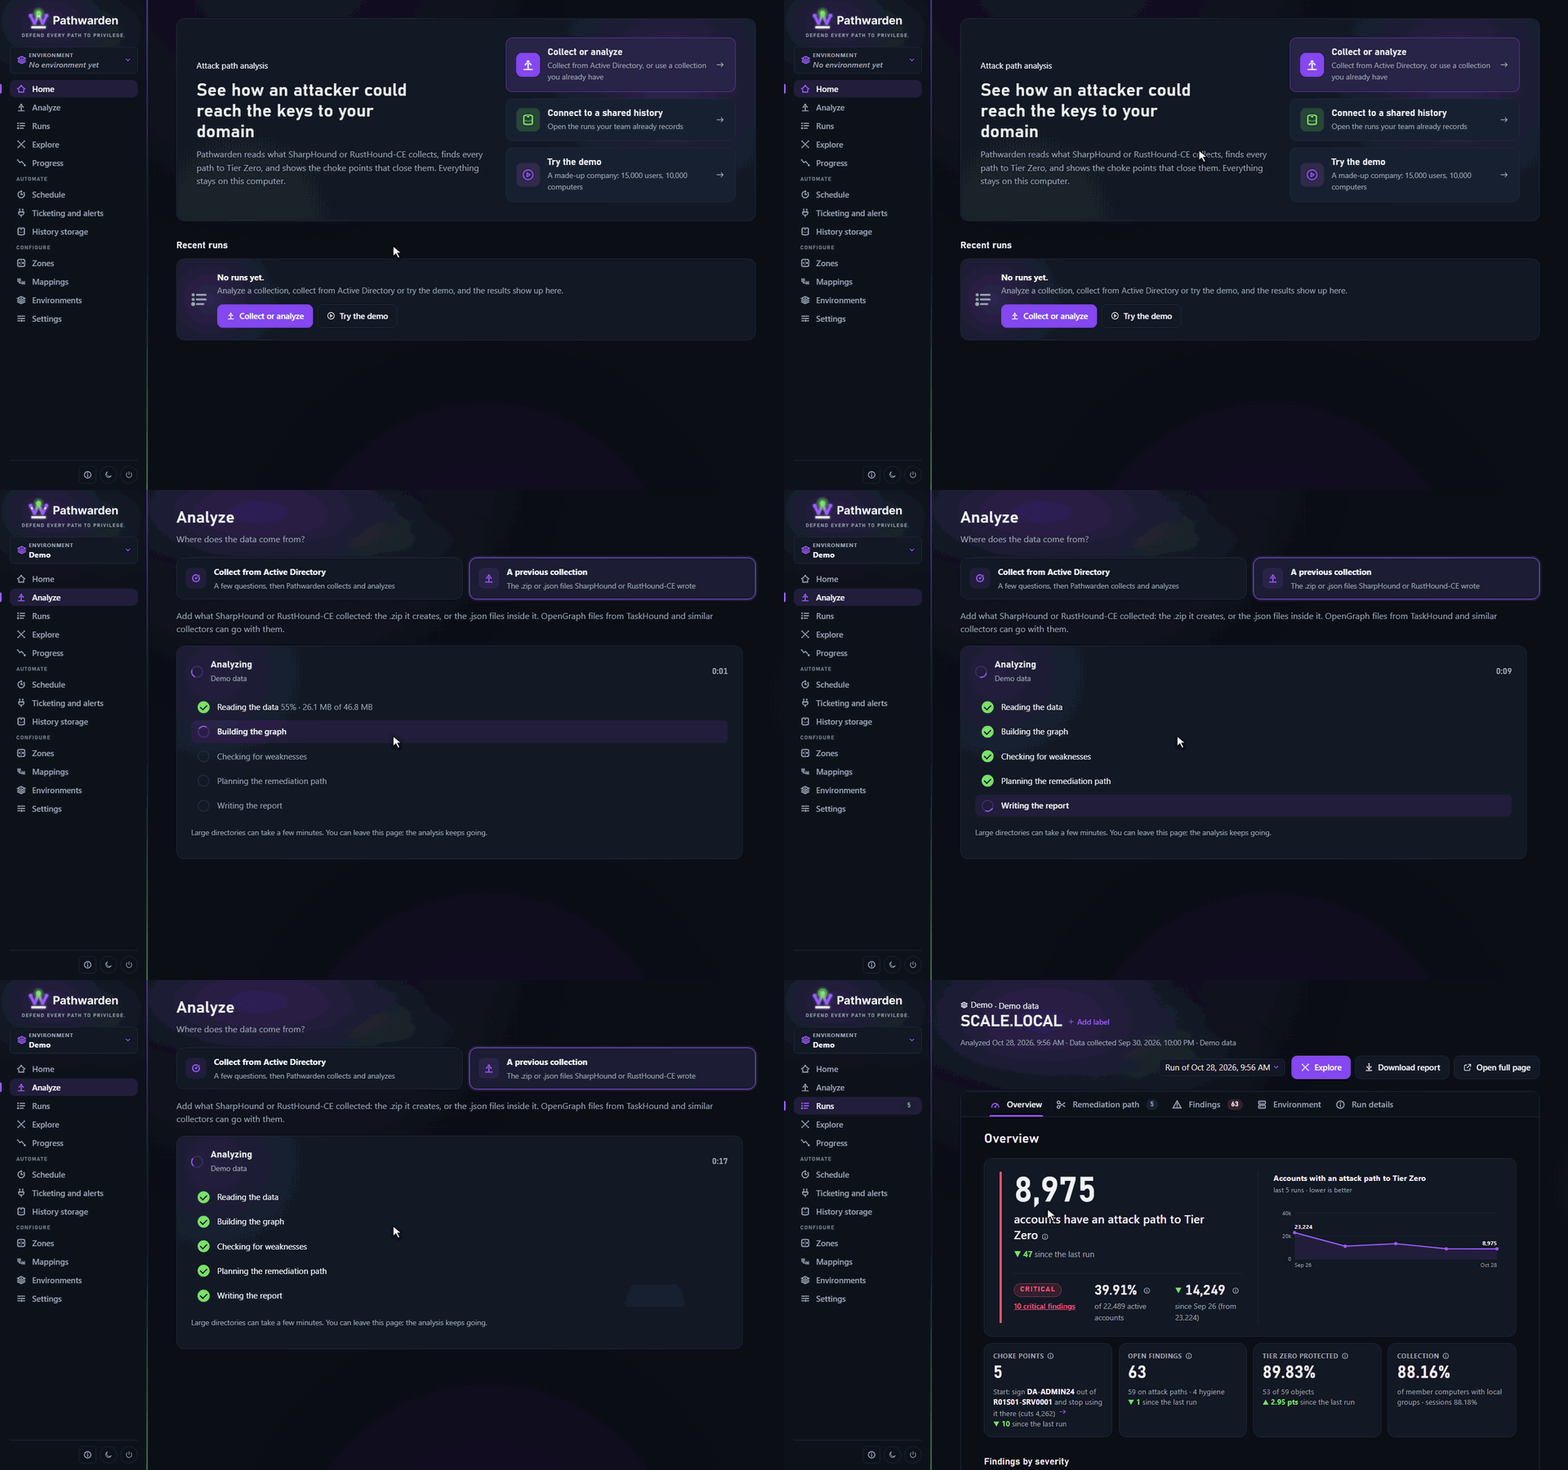
In the app
- Run
pathwarden ui. - On Home, click Try the demo.
- Wait for the analysis. The run page opens on Overview.
On the command line
pathwarden demo -o demo-report.html-i demo: reads the demo collection in any command.
Analyze a collection
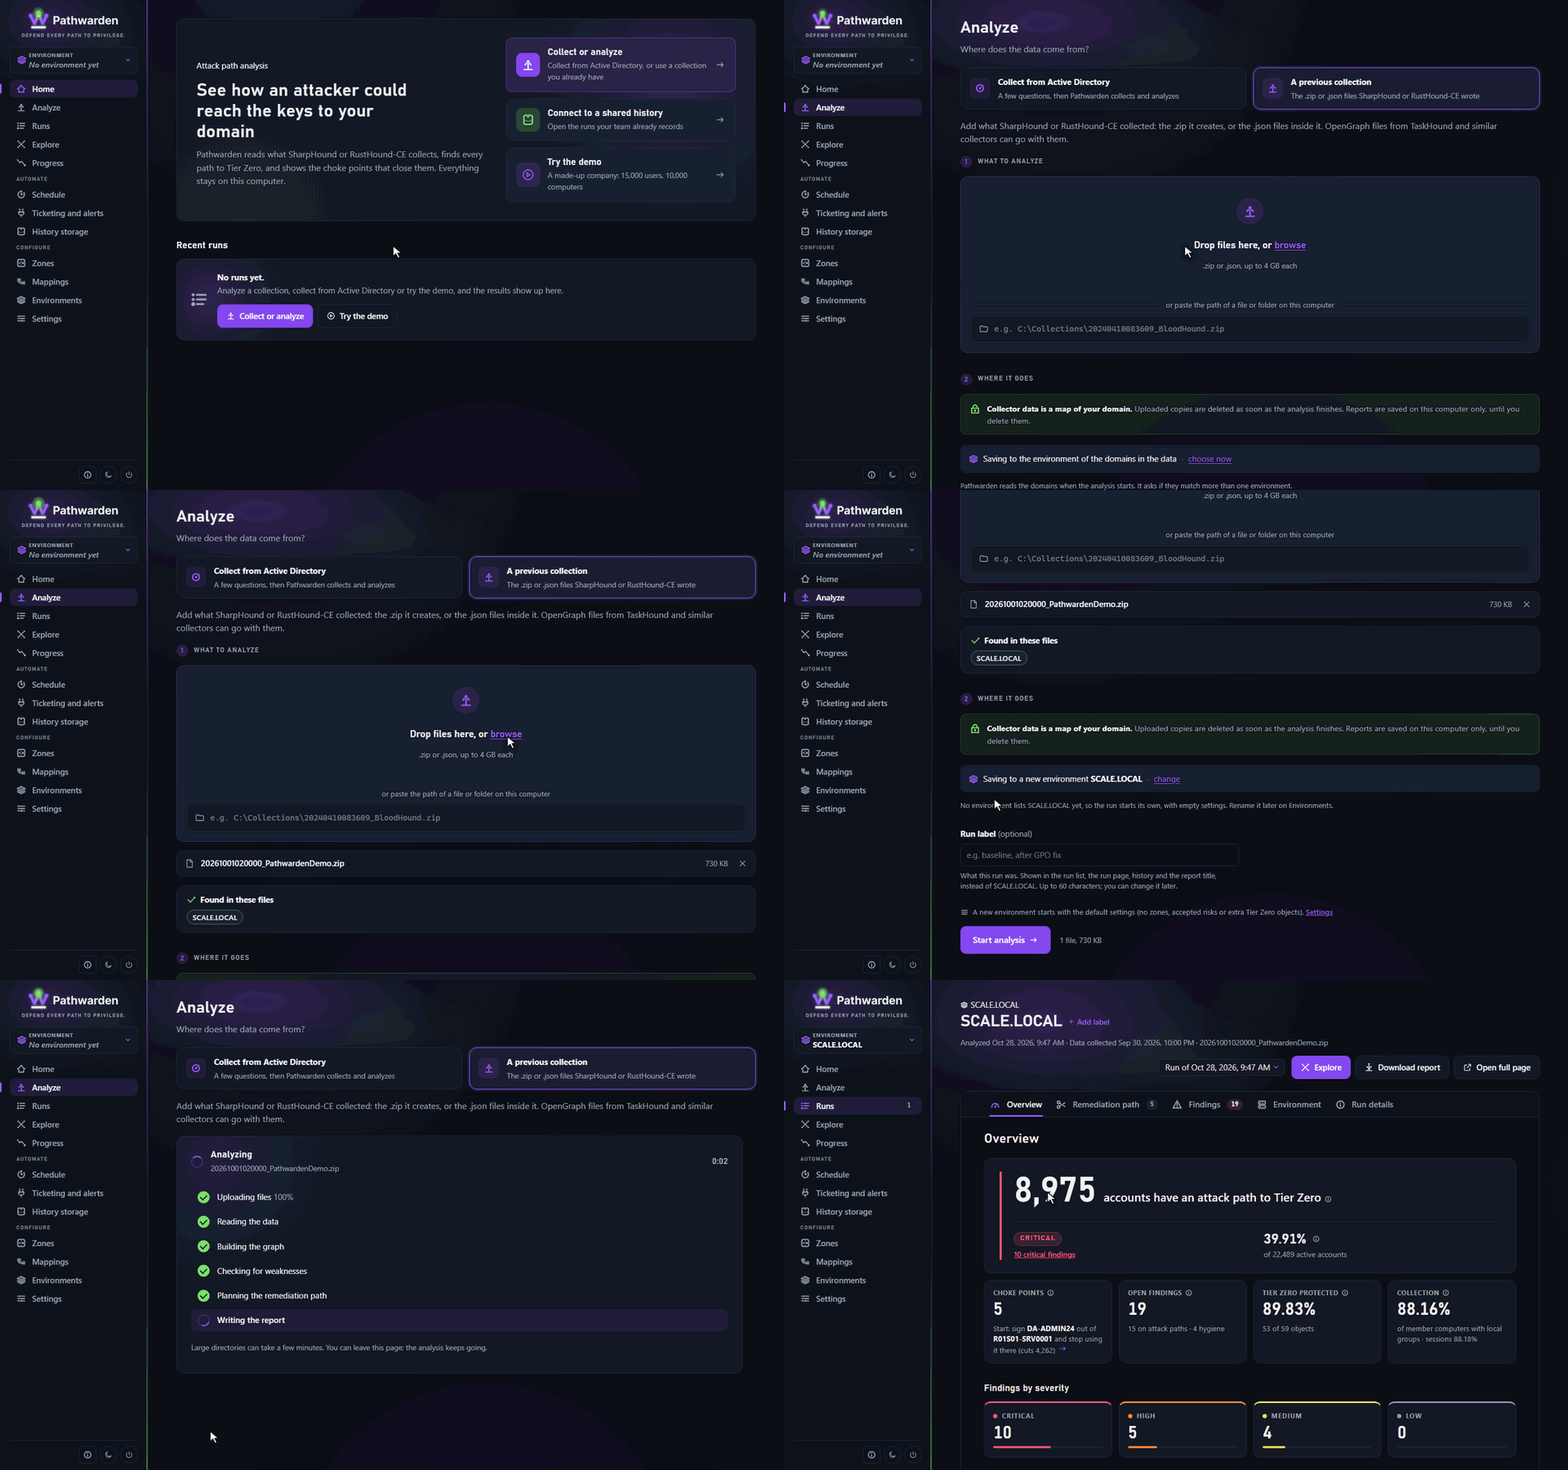
In the app
- In the rail, click Analyze, then A previous collection.
- Under 1 What to analyze, drop the
.zipor click browse. - Under 2 Where it goes, check the environment.
- Click Start analysis.
On the command line
pathwarden run -i C:\Collections\20261001020000_BloodHound.zip --save--save records the run in the environment, as the app does.
Collect from Active Directory
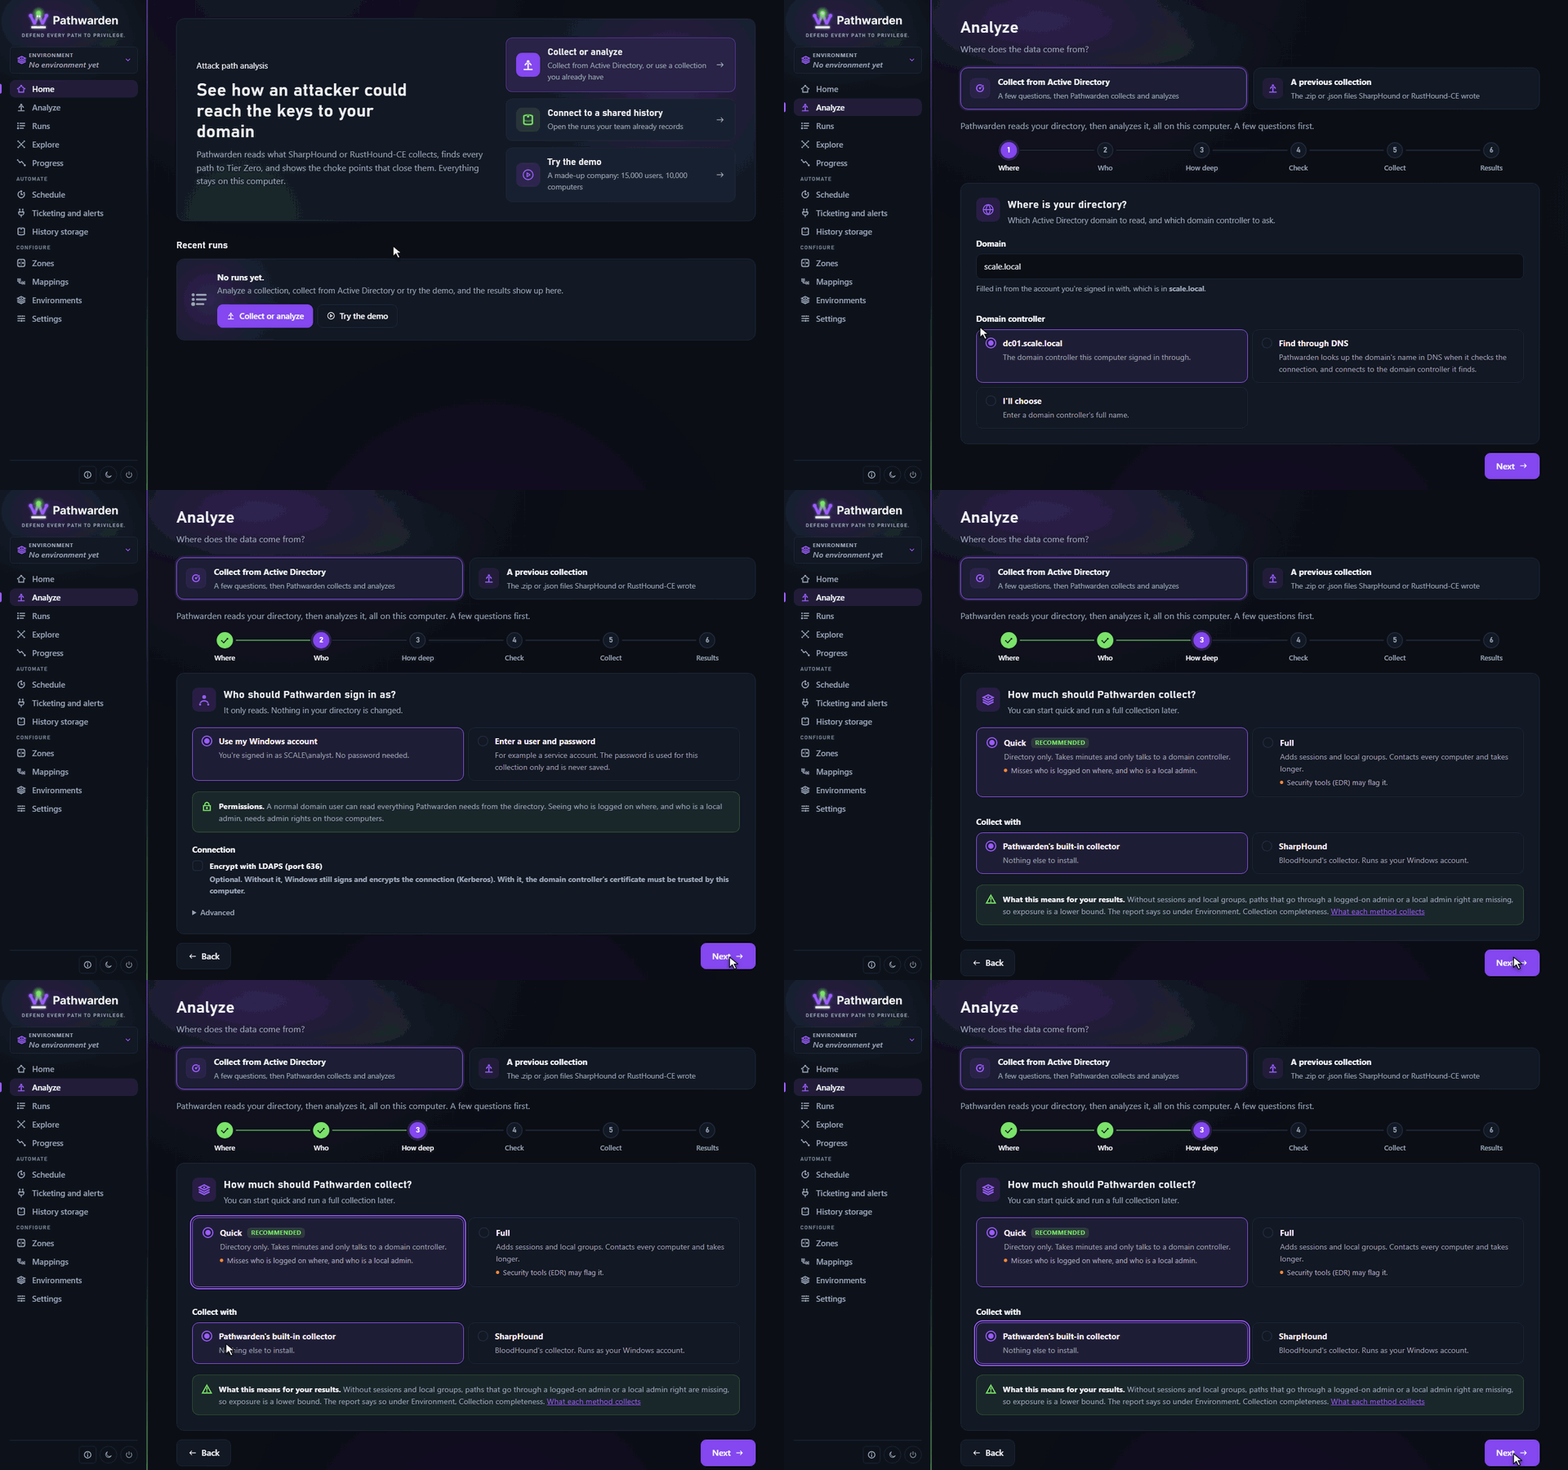
In the app
- In the rail, click Analyze.
- Where: check the Domain and the Domain controller. Click Next.
- Who: choose Use my Windows account or Enter a user and password. Click Next.
- How deep: choose Quick (the directory only) or Full (adds sessions and local groups). Click Next.
- Check: wait for the check to pass. Click Next.
- Collect: click Start collecting. The run page opens when the analysis finishes.
On the command line
pathwarden collect --domain scale.local --output C:\Temp\collect --saveAdd --scope all for a Full collection, or --user NAME --ldaps for a
user and password.
More: Collecting.
Read the report
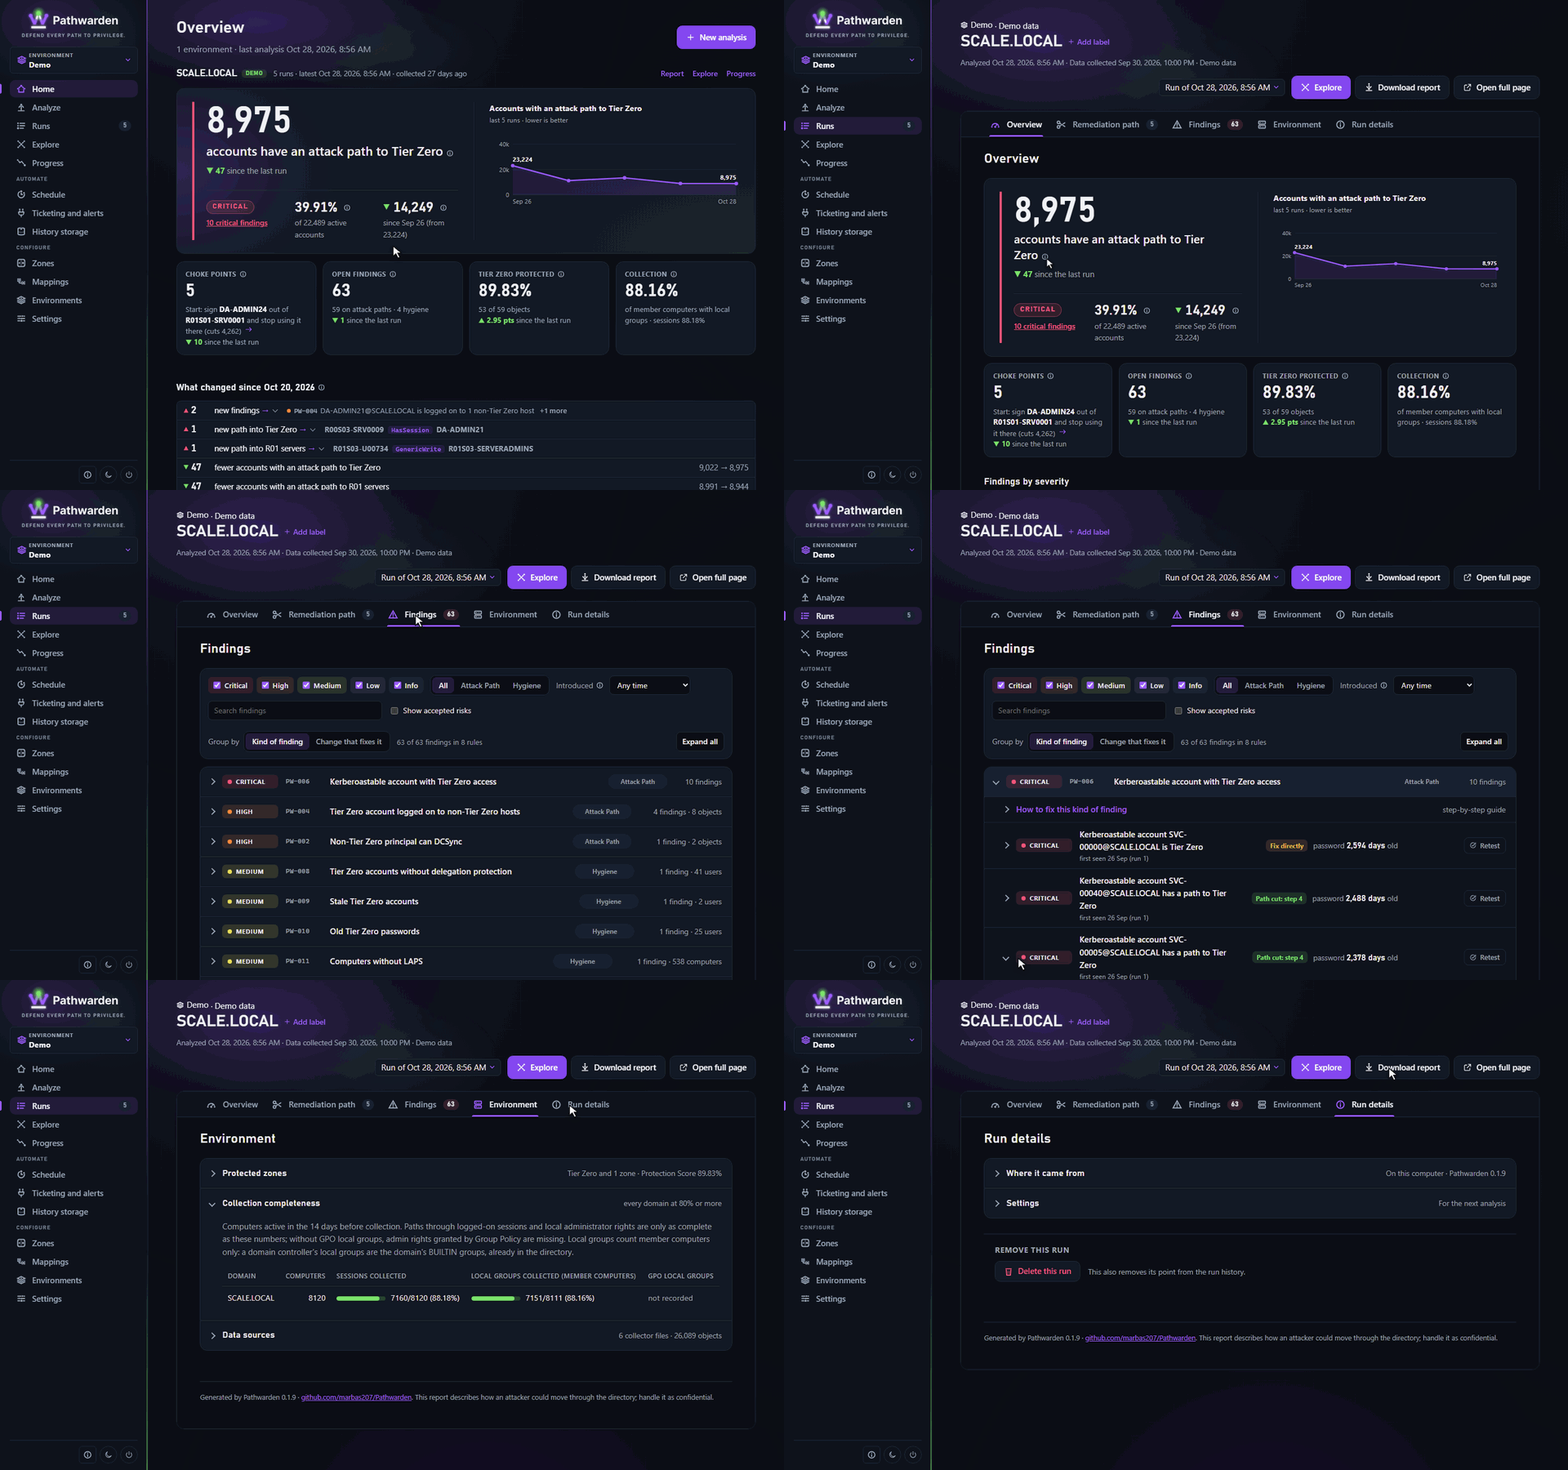
In the app
- In the rail, click Runs and open a run.
- Read Overview. Click the ⓘ beside a number for what it means.
- Open Findings, then a finding for its attack path.
- To share it, click Download report.
On the command line
pathwarden posture -i demo:
pathwarden report  -i demo: -o report.html
Follow the remediation path
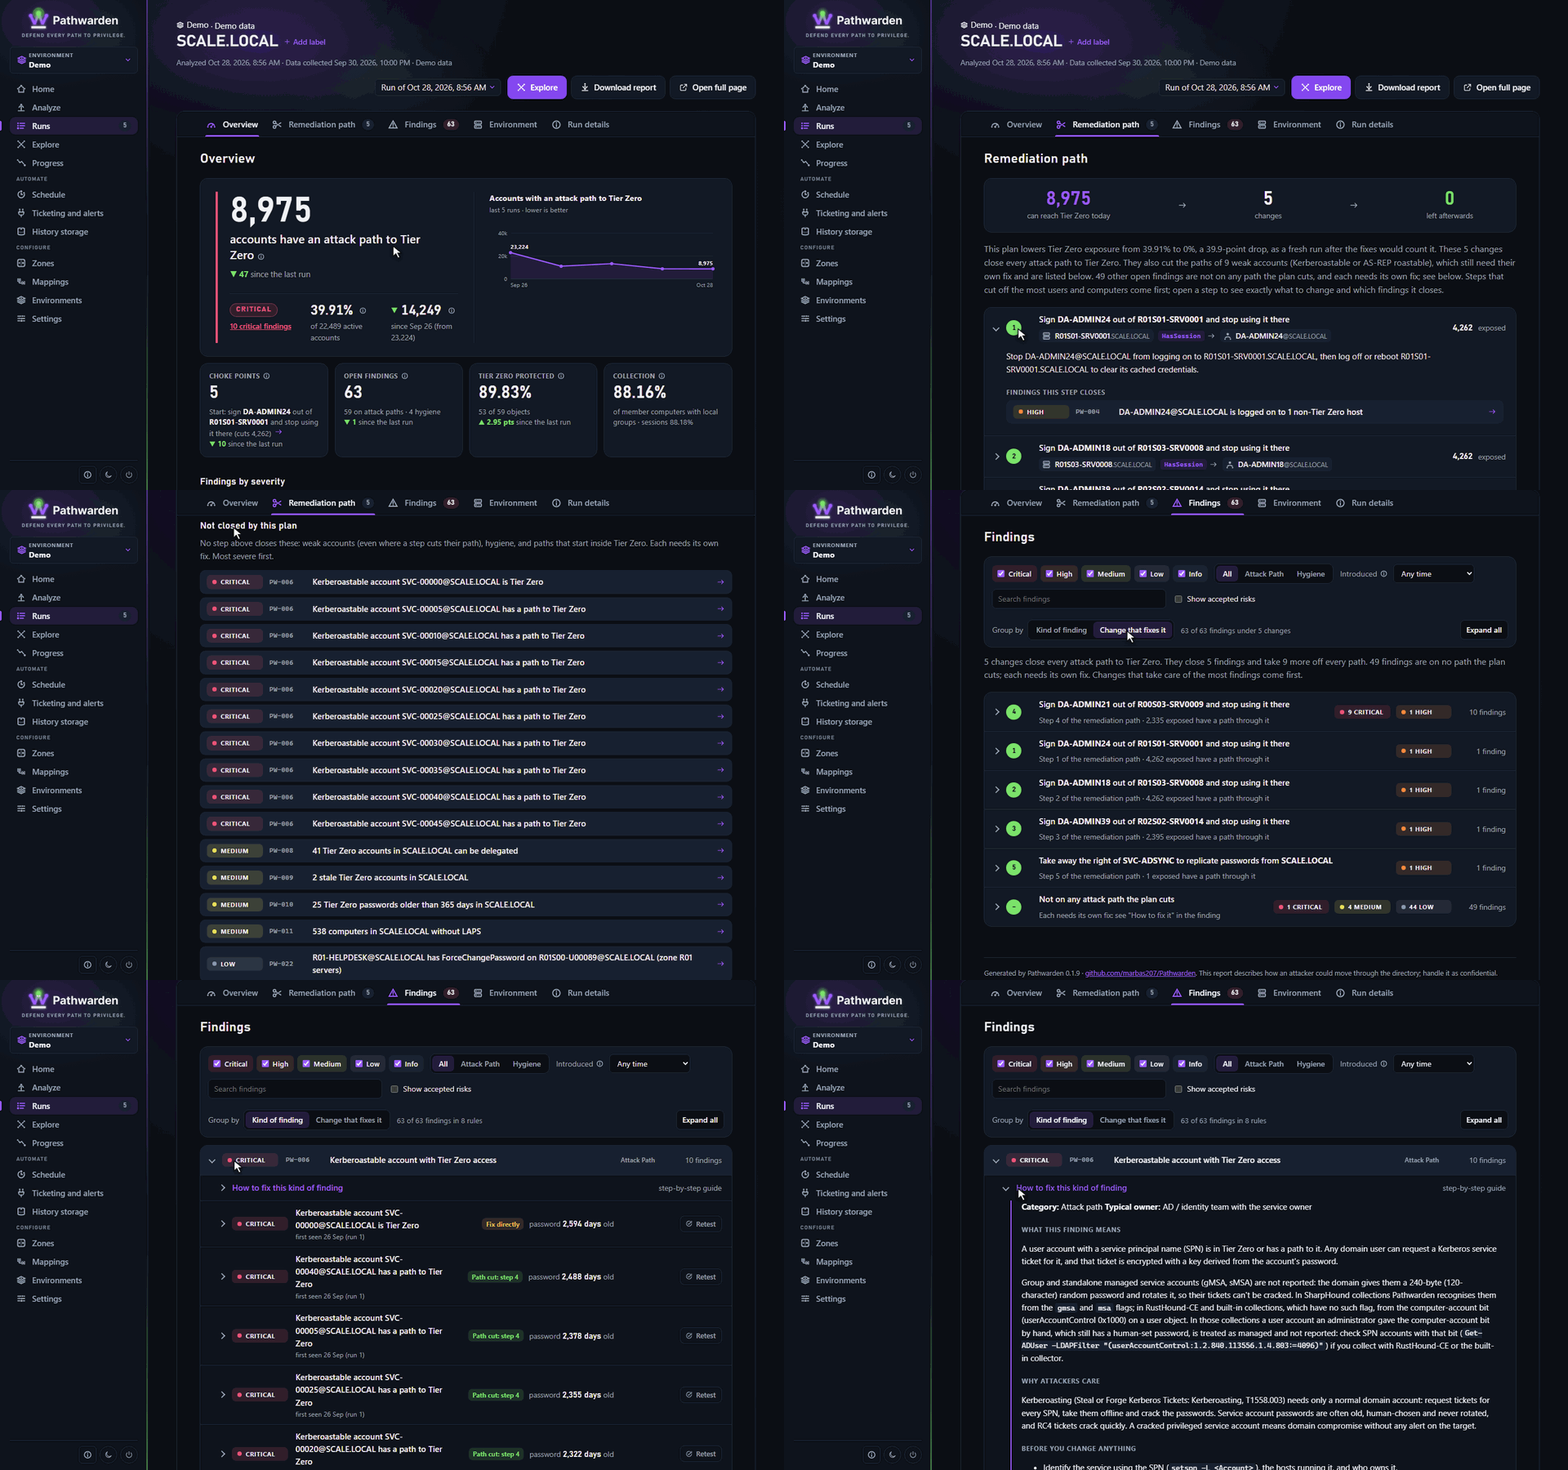
In the app
- On a run page, open Remediation path.
- Open a step for what to change and which findings it closes.
- Open a rule's How to fix this kind of finding for its guide.
On the command line
pathwarden plan -i demo: --top 5
pathwarden findings -i demo: --by-fix
pathwarden guide PW-006
Retest a finding
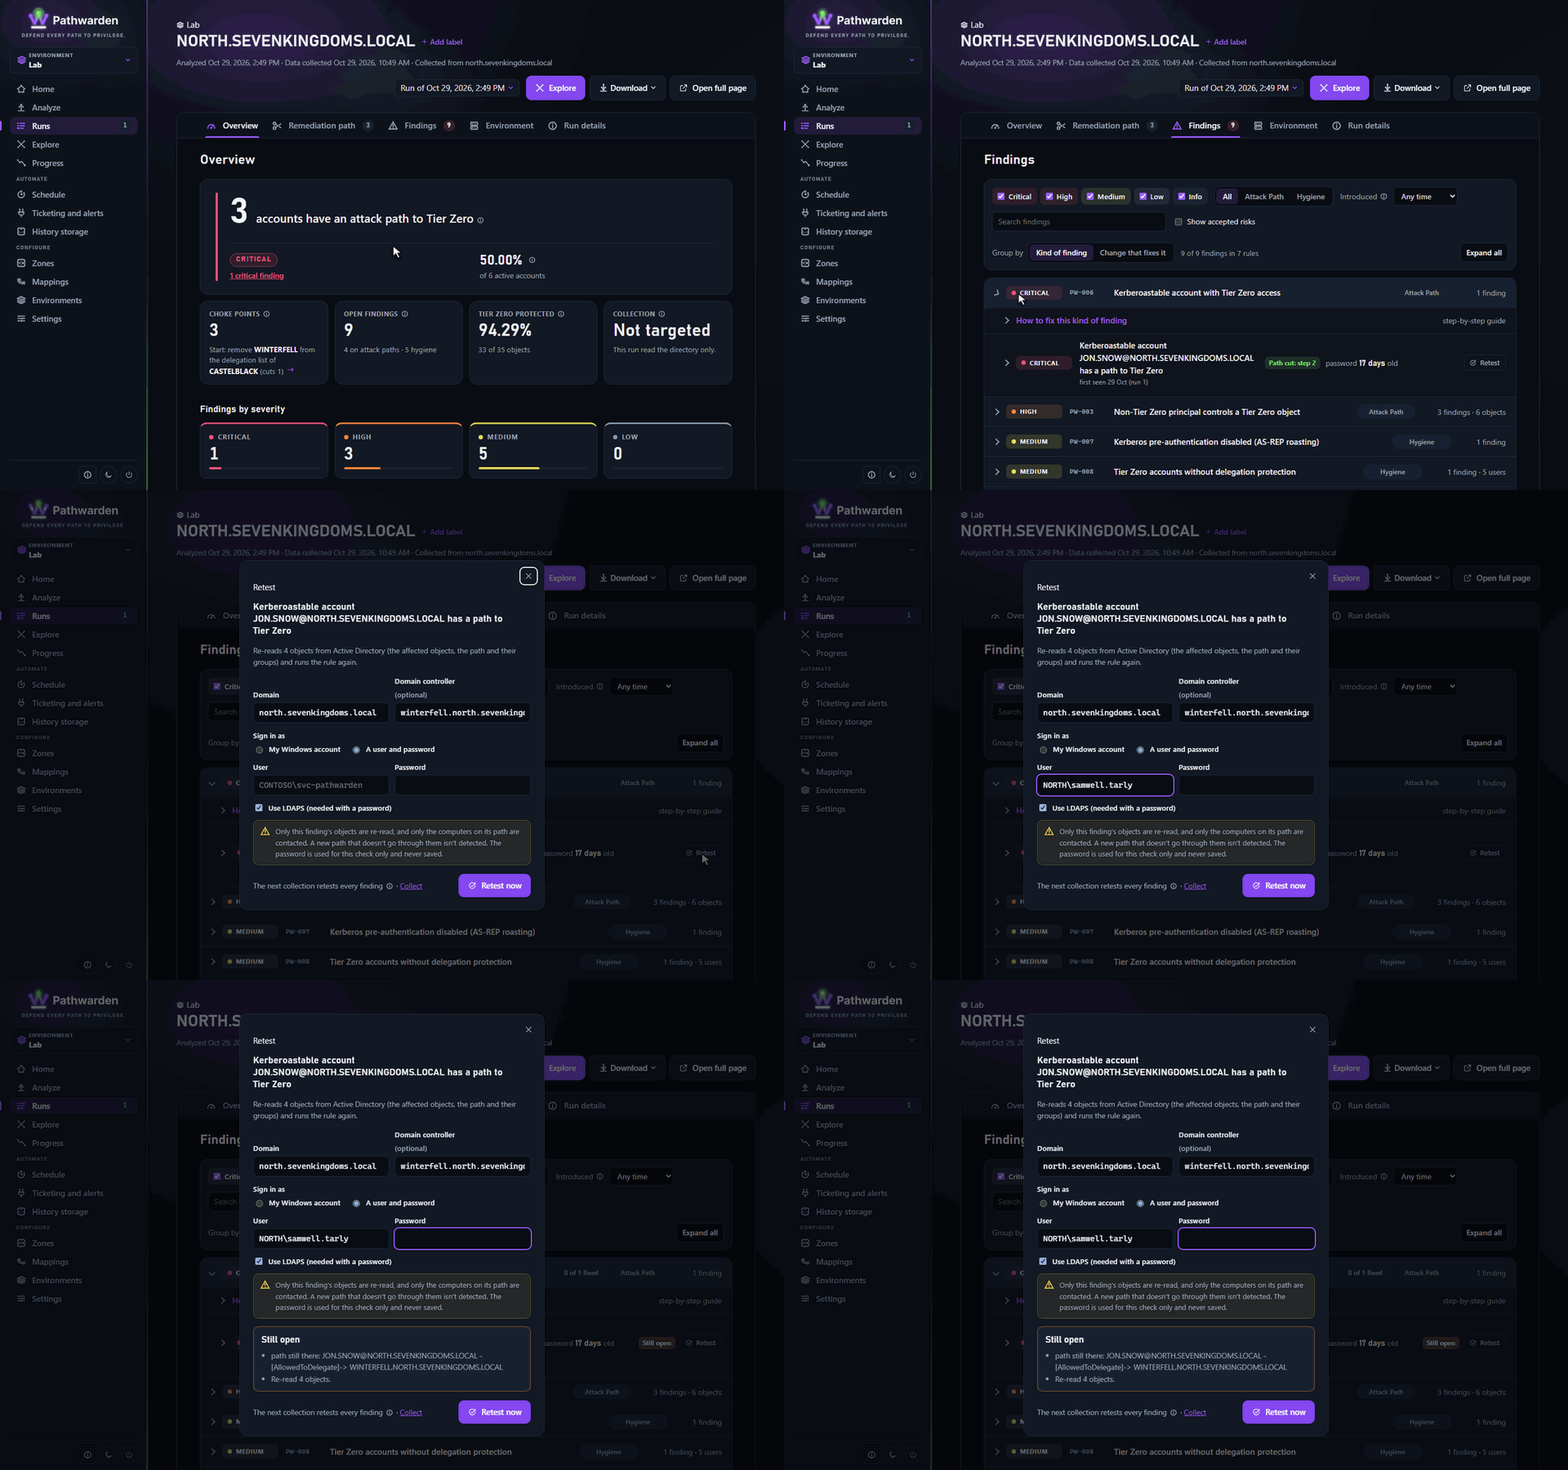
In the app
- On a run page, open Findings.
- Click Retest on the finding's row.
- Check the Domain and choose Sign in as.
- Click Retest now. The verdict is Fixed ✓, Still open or Can't tell.
On the command line
pathwarden retest targeted --finding PW-006-8ae0b31a46eacada --env Lab
pathwarden retest -i C:\Temp\collect --env Lab
More: Retesting a finding.
Accept a risk
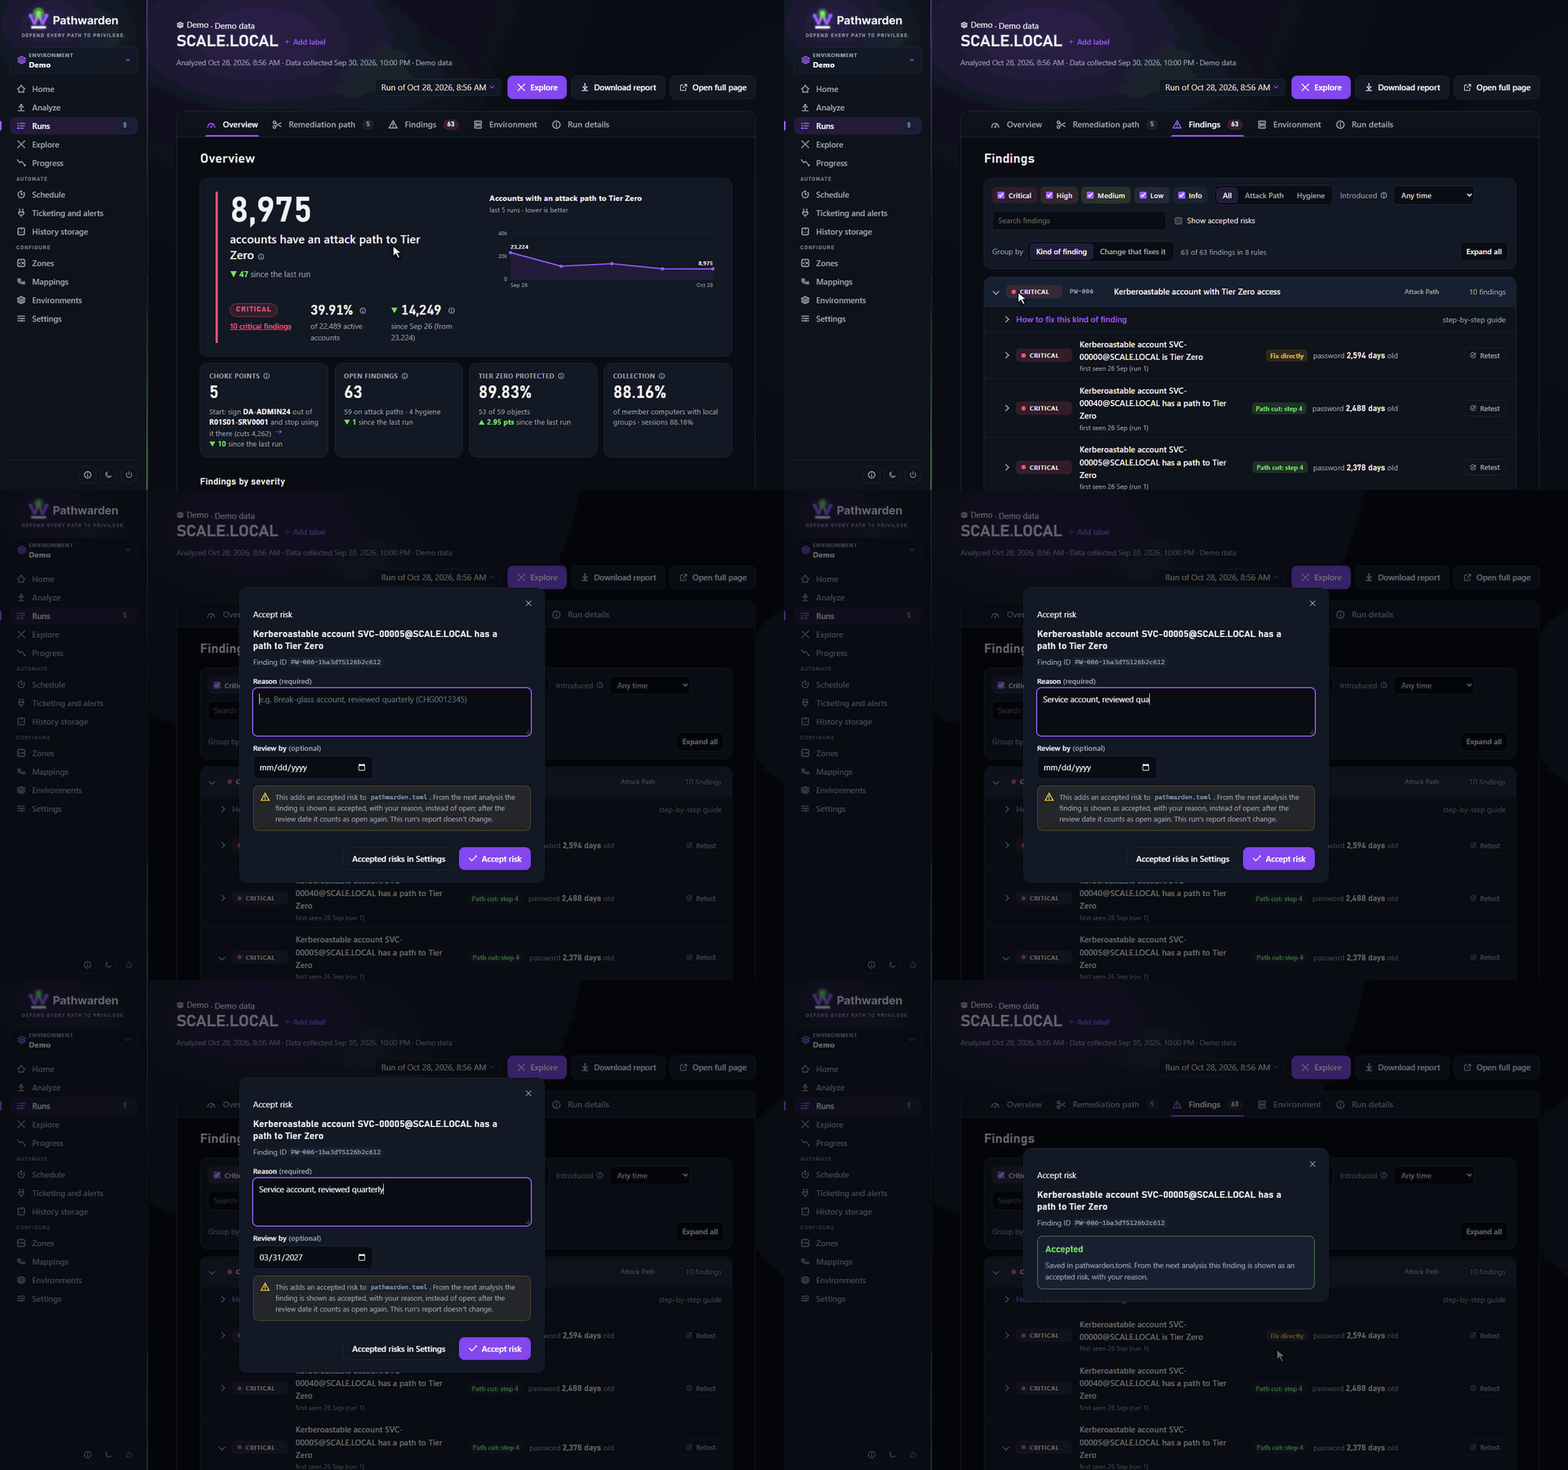
In the app
- On Findings, open the finding.
- Click Accept risk.
- Type the Reason and, if needed, a Review by date.
- Click Accept risk. It applies from the next analysis.
On the command line
pathwarden config risk accept --finding PW-006-5ca8fbd0a56628a3 --reason "Service account, reviewed quarterly" --review-by 2027-03-31 --env Demo--rule PW-011 in place of --finding accepts a whole rule.
More: Actions on a finding.
Set a rule's severity
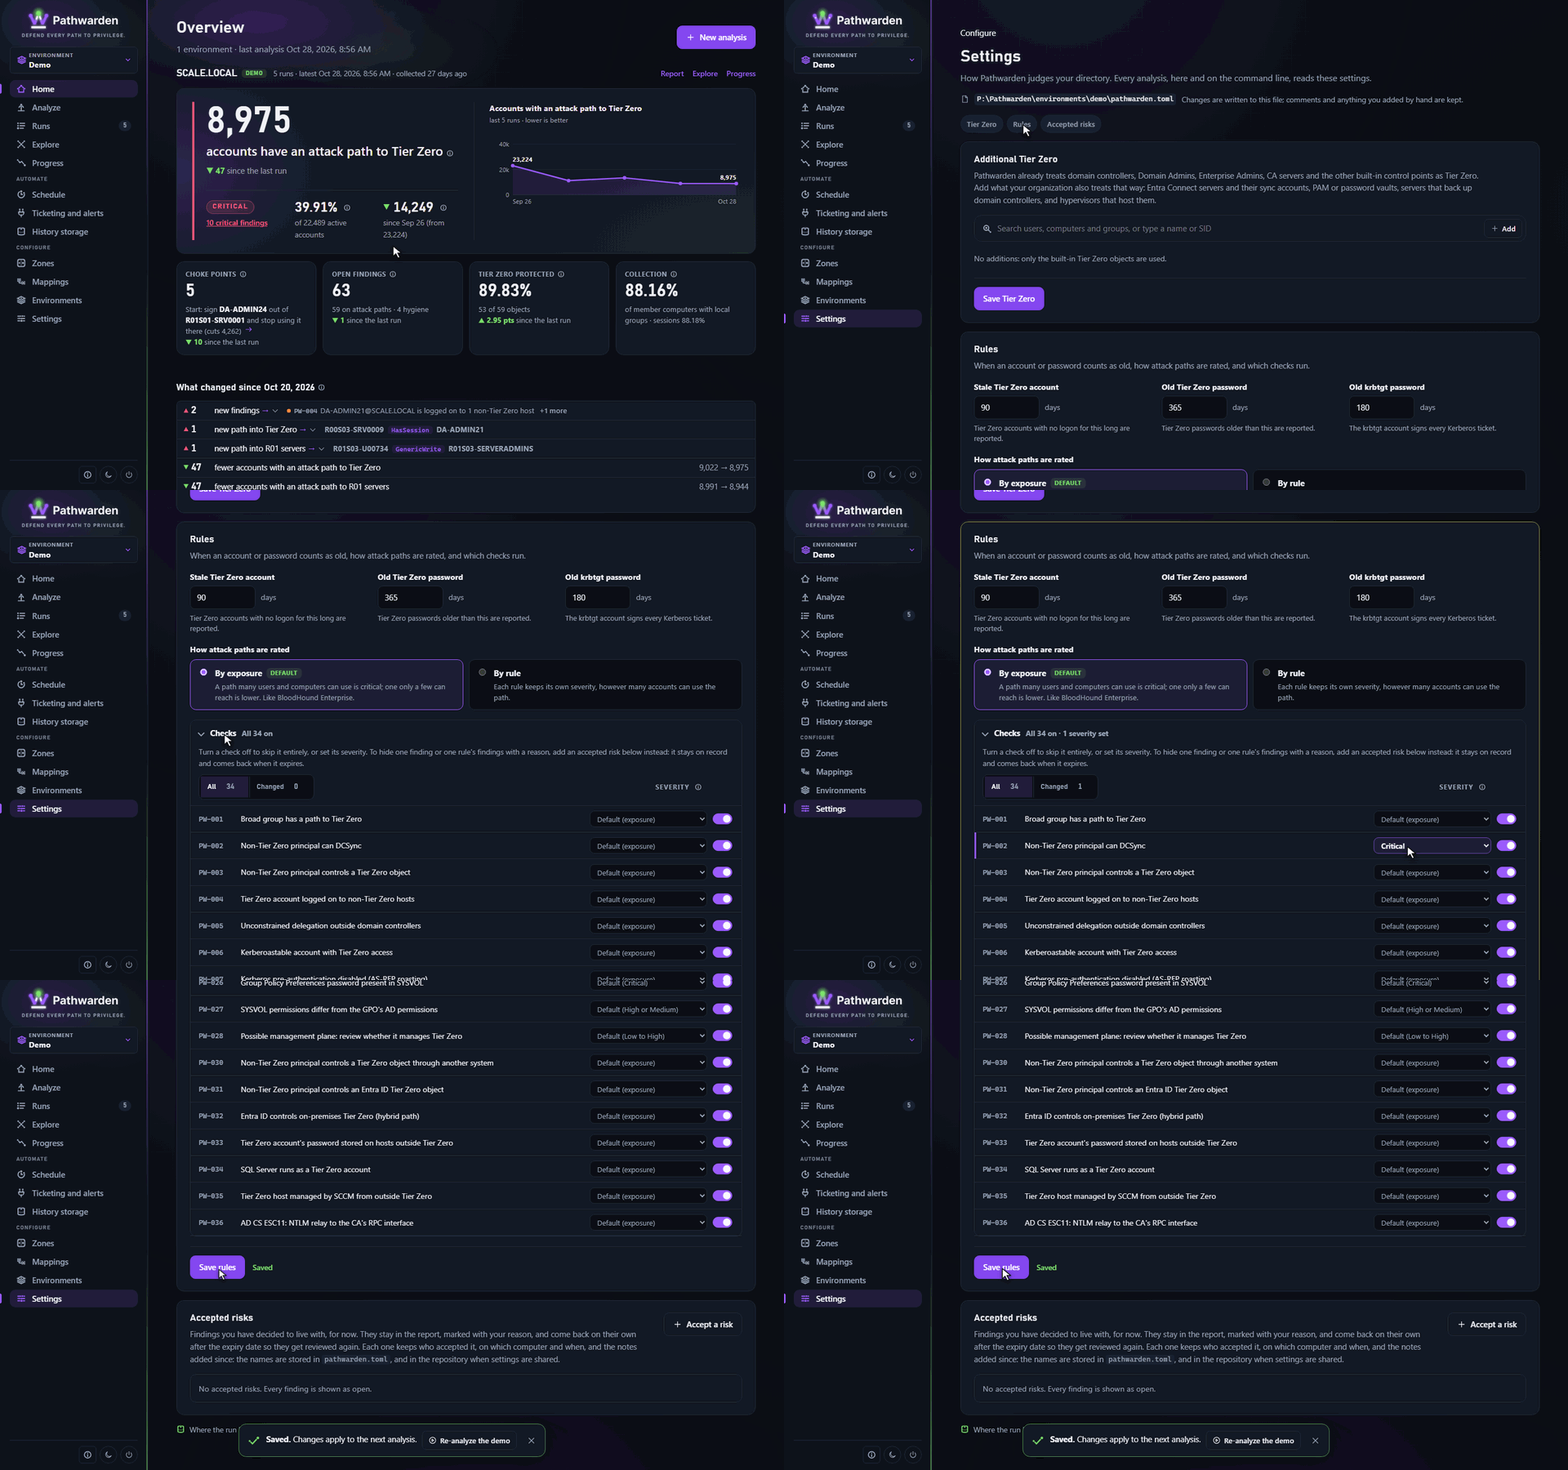
In the app
- In the rail, click Settings, then Rules.
- Pick the rule's severity.
- Click Save rules. It applies from the next analysis.
On the command line
pathwarden config rules set --severity PW-002=critical --env DemoExplore a path
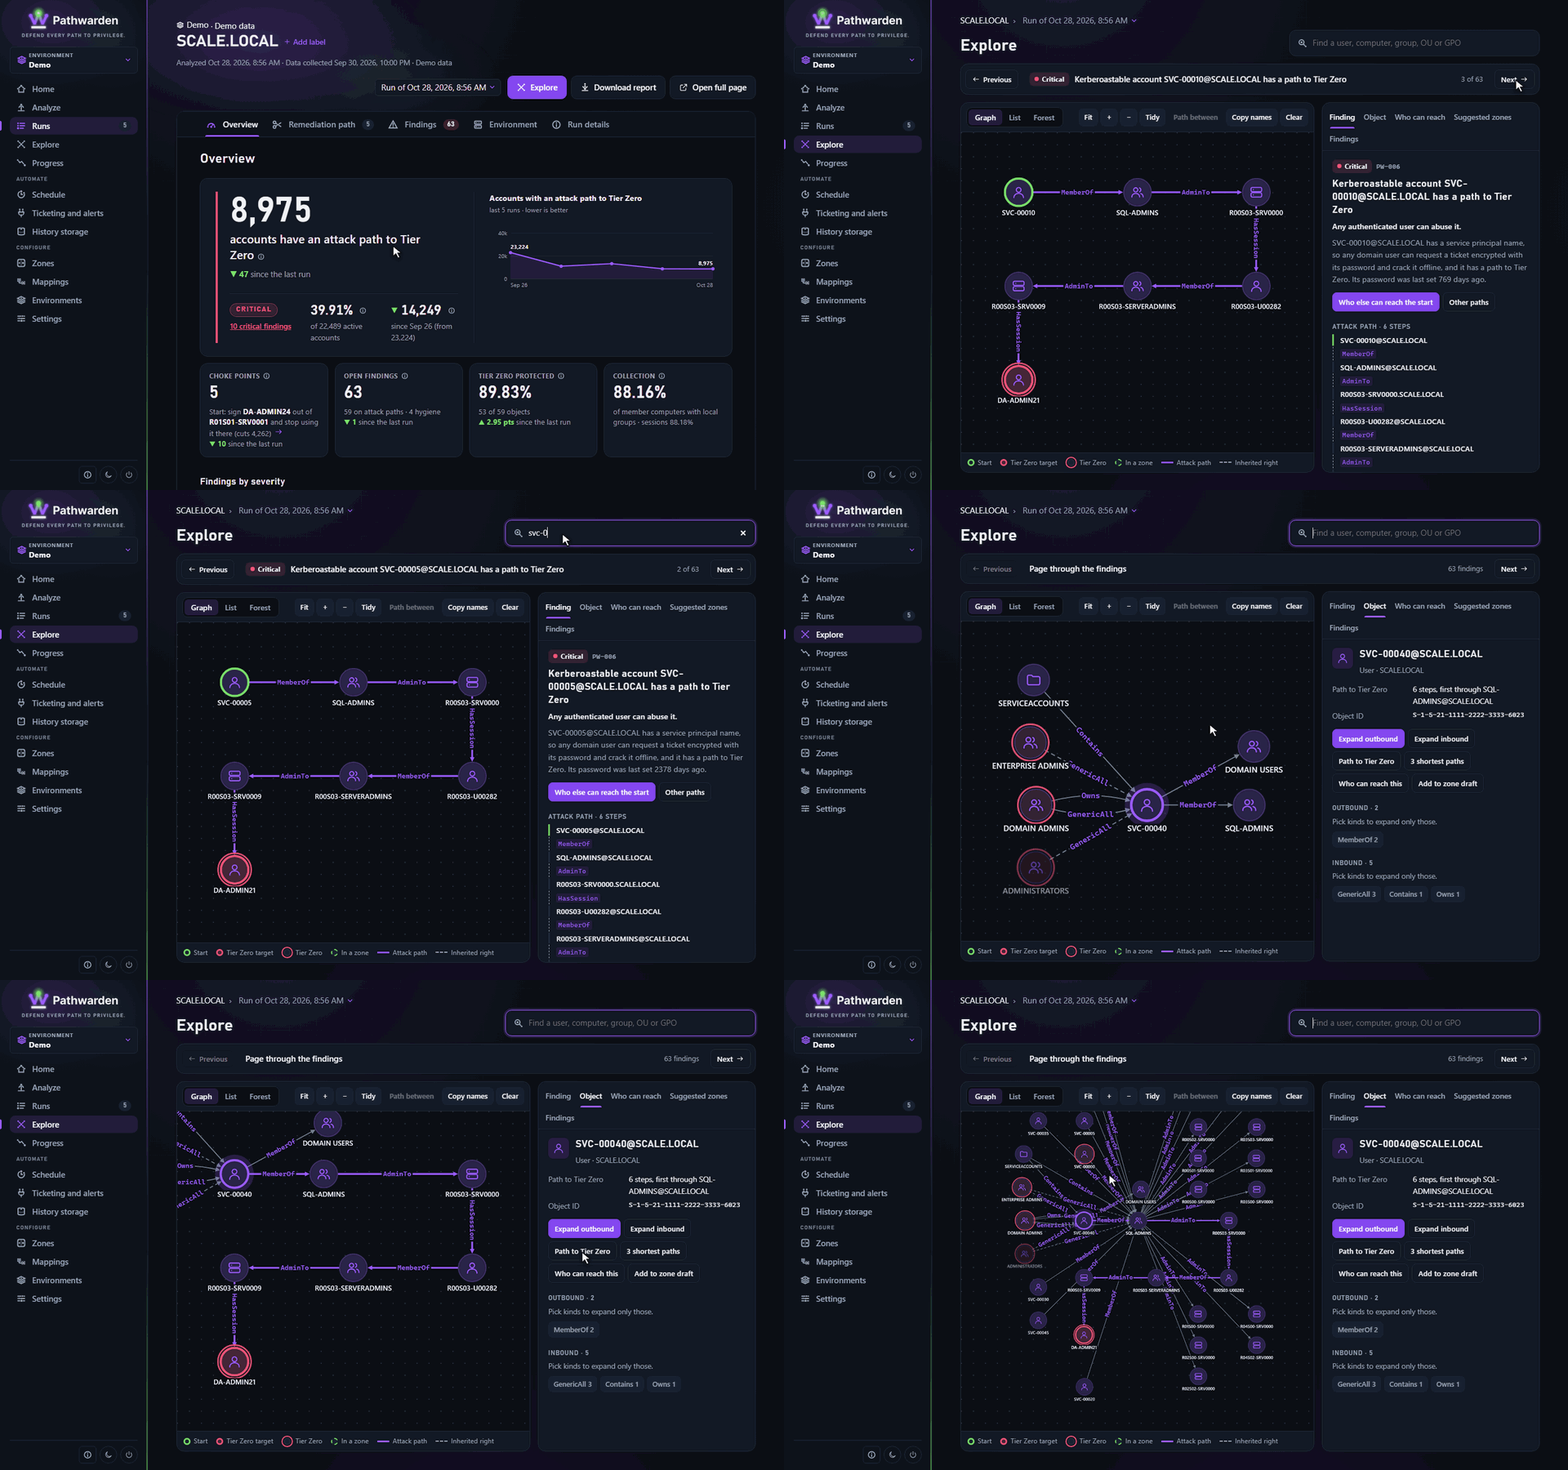
In the app
- On a run page, click Explore.
- Click Previous and Next to page through the findings.
- Search for an object and pick it.
- Click Path to Tier Zero or Who can reach this.
On the command line
pathwarden path  -i demo: --from SVC-00040@SCALE.LOCAL
pathwarden reach DA-ADMIN21@SCALE.LOCAL --env Demo
More: Exploring a run.
Schedule nightly runs
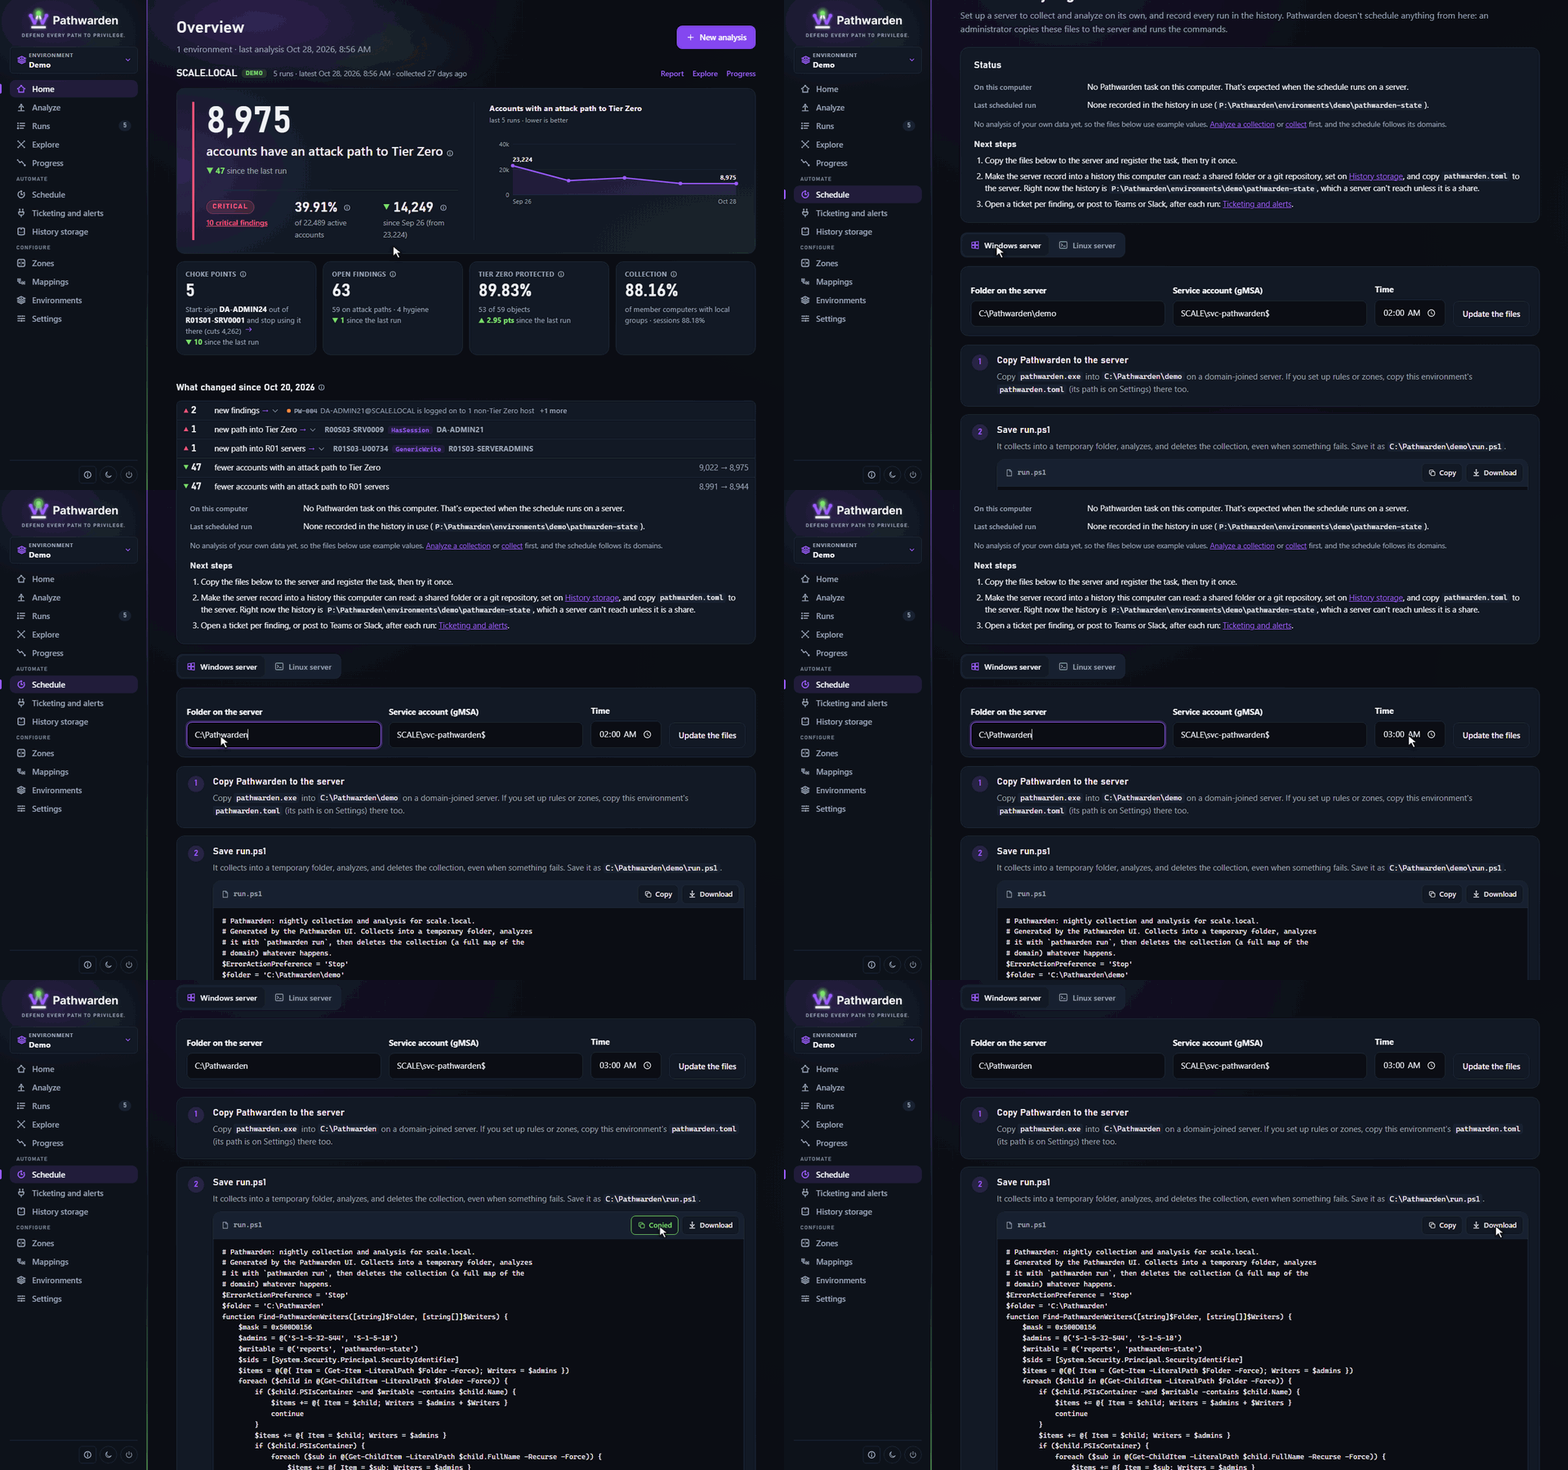
In the app
- Under Automate, click Schedule, then Windows server or Linux server.
- Under Repeat the collection of, pick a run and click Use this run.
- Fill in Folder on the server, Service account (gMSA) or Sign in as, and Time. Click Update the files.
- Download each file. An administrator copies them to the server and runs the commands shown.
On the command line
pathwarden schedule --domain scale.local --folder C:\Pathwarden --account 'SCALE\svc-pathwarden$' --at 02:00 --output .\scheduleMore: Run on a schedule.
Set up ticketing
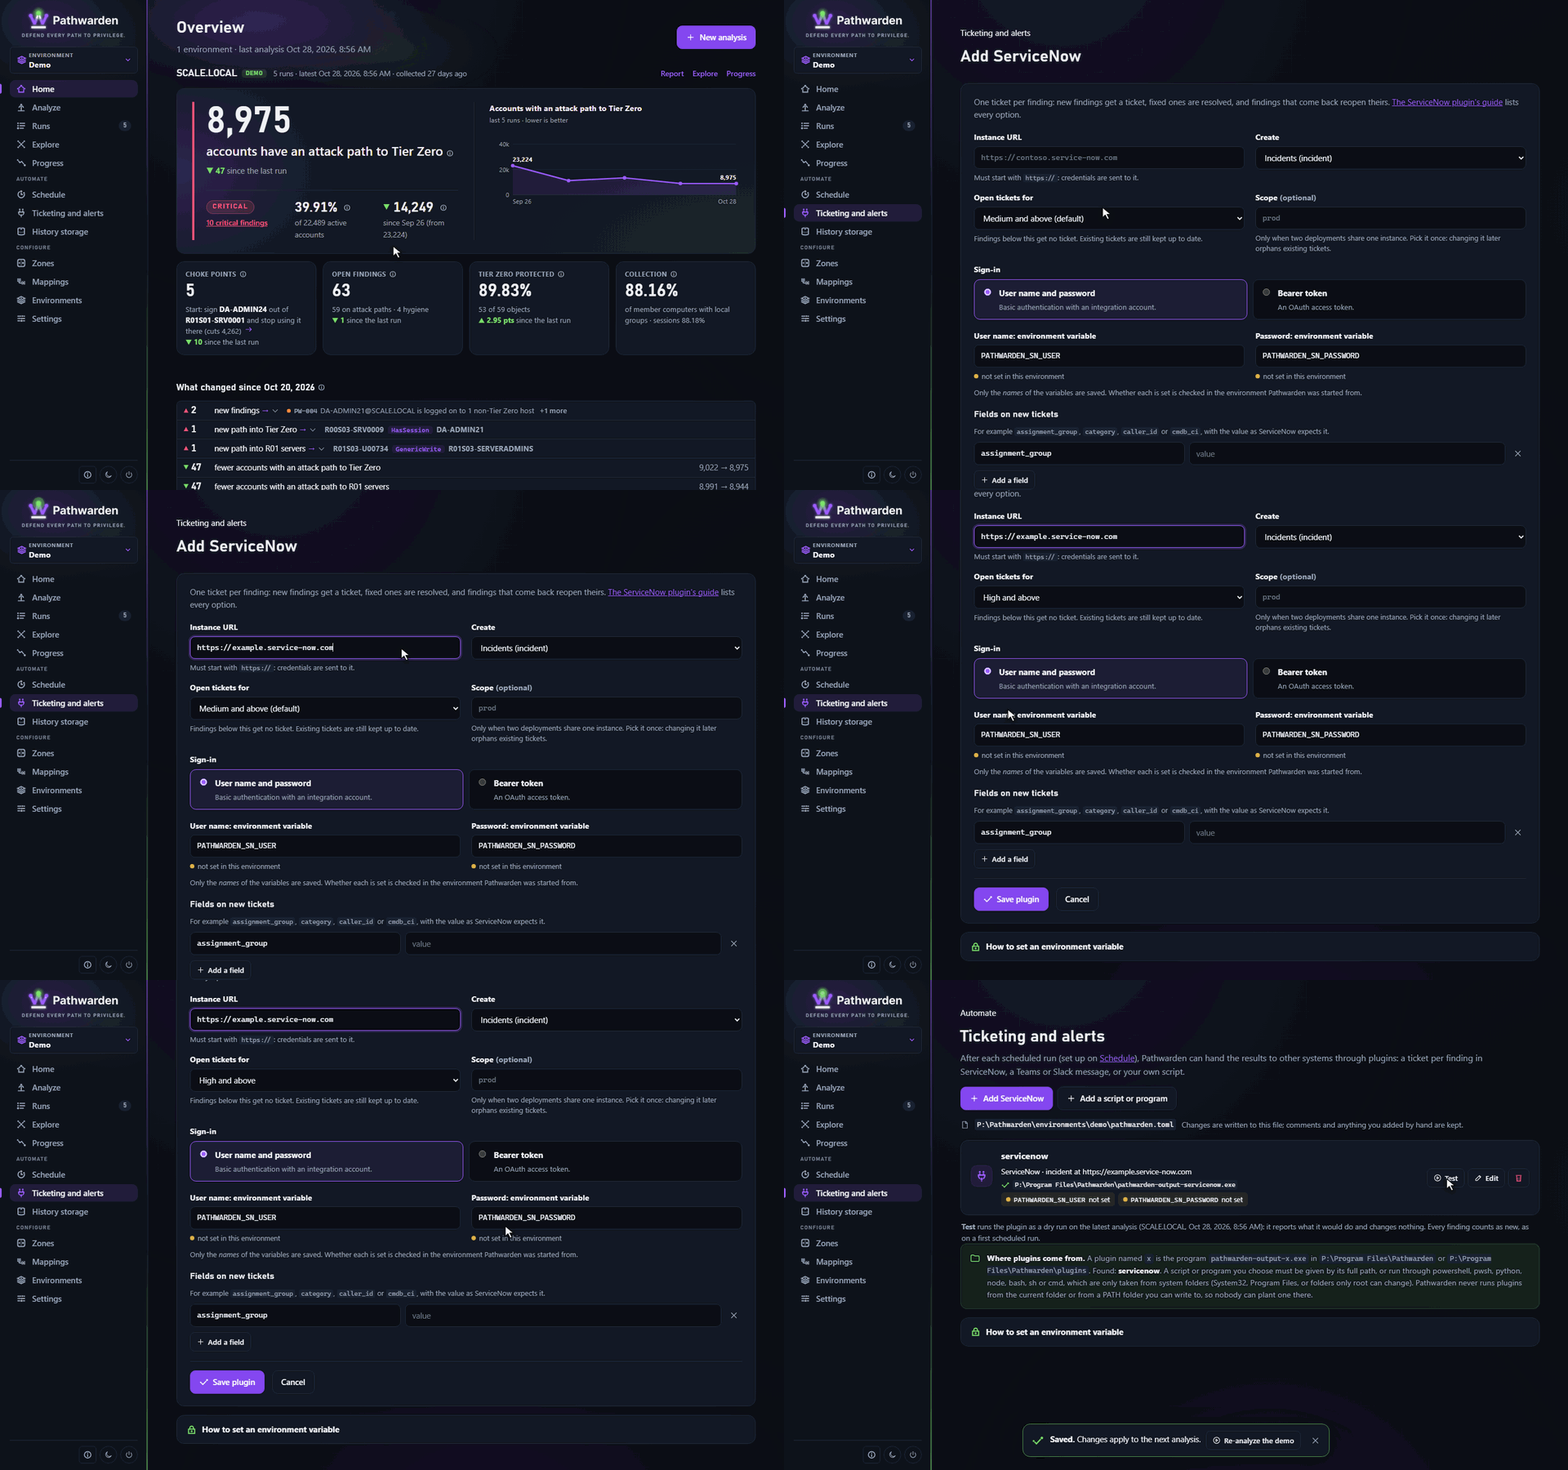
In the app
- Under Automate, click Ticketing and alerts, then Add ServiceNow or Add Jira.
- Fill in the address and what to create:
- ServiceNow: Instance URL, Create and Open tickets for.
- Jira: Jira address, Jira (Cloud or Data Center), Project key, Issue type and Open issues for.
- Under Sign-in, type the names of the environment variables that hold the secrets. For Jira Cloud that is your Atlassian e-mail and an API token.
- Check the Safety limits (the defaults suit most domains) and click Save plugin.
- Set those variables where Pathwarden runs, and click Test.
On the command line
pathwarden plugins add servicenow --instance https://example.service-now.com --min-severity high --env Demo
pathwarden plugins add jira --instance https://example.atlassian.net --project SEC --min-severity high --env Demo
Both take --max-create and --max-resolve-percent for the safety
limits.
More: Output plugins.
Keep the run history in a shared place
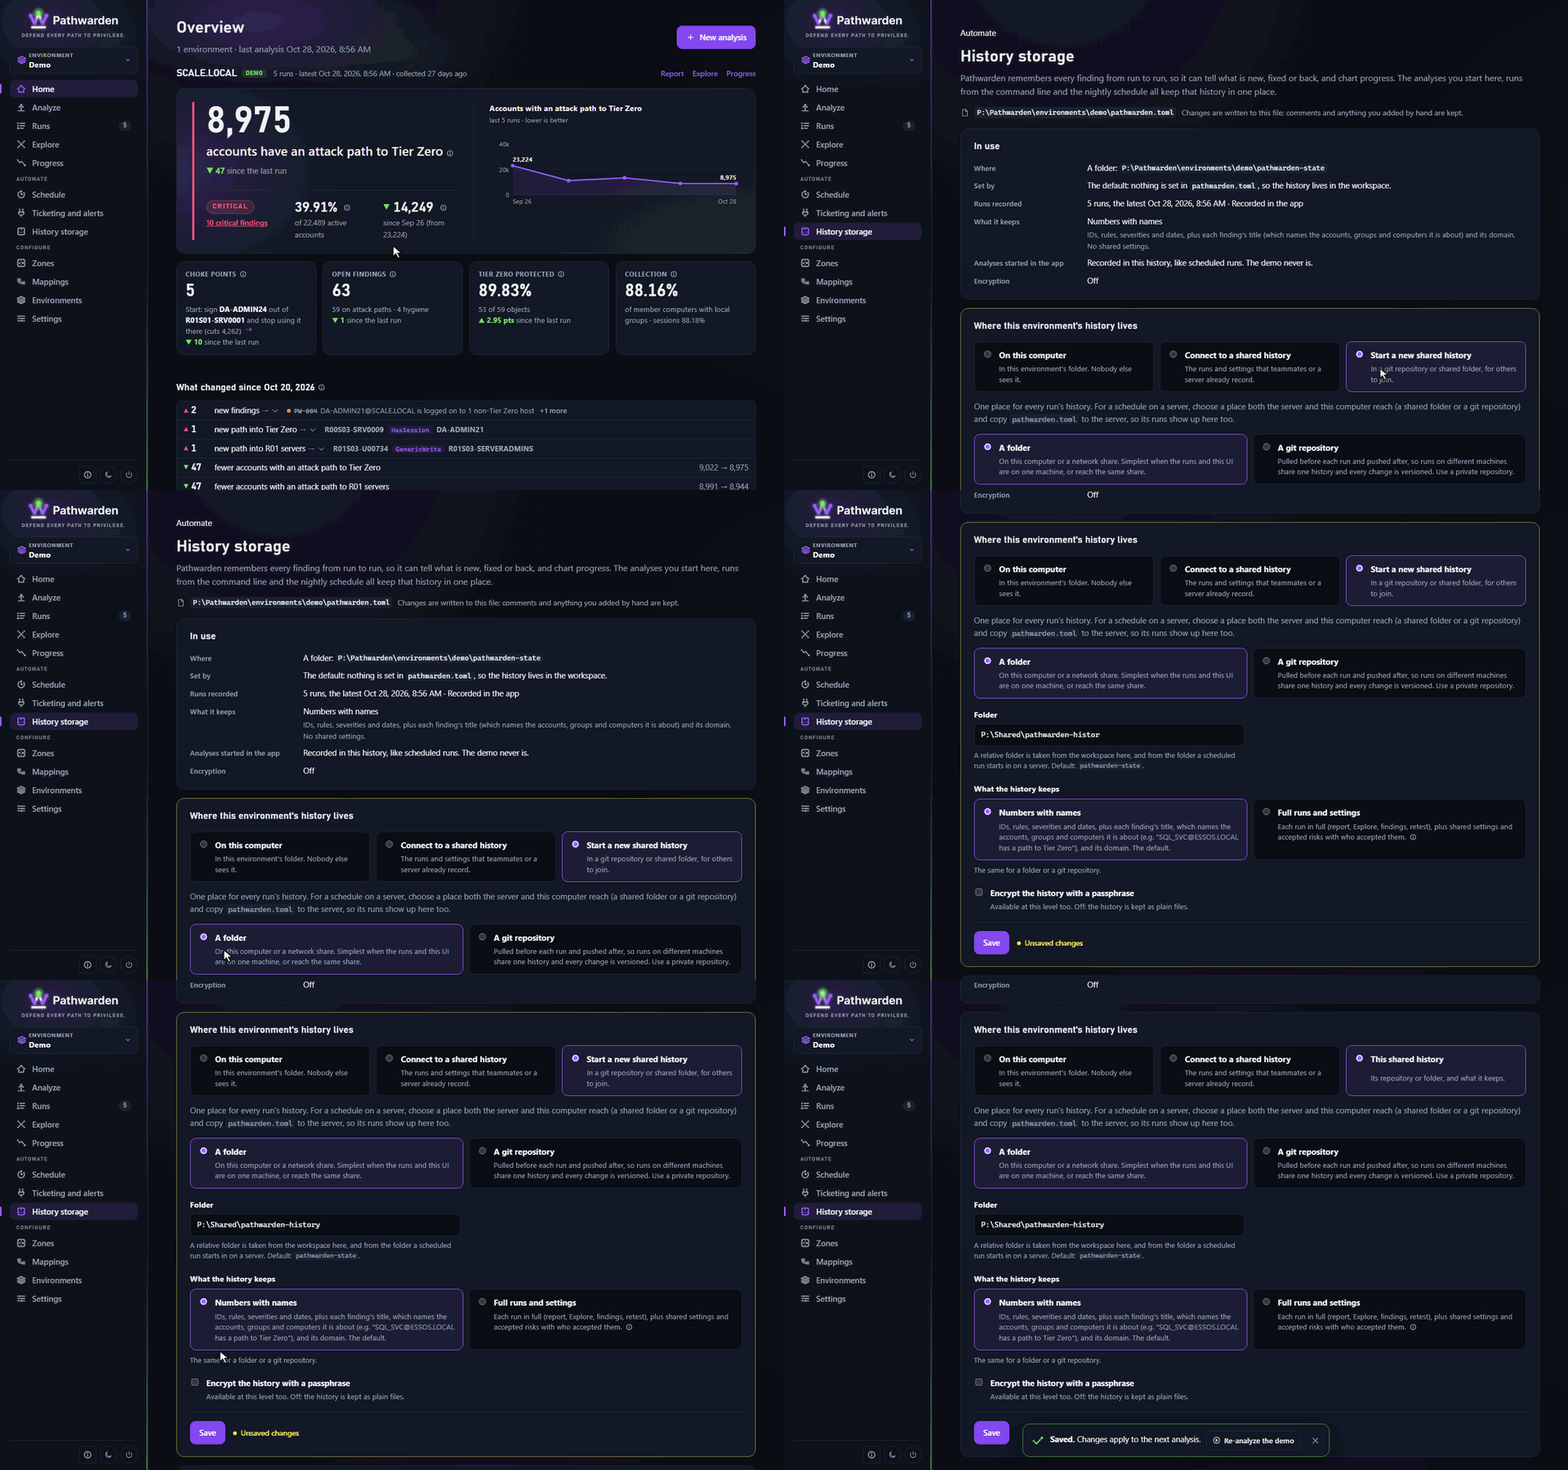
In the app
- Under Automate, click History storage, then Start a new run history.
- Choose A folder and type the Folder, or A git repository and fill in the Repository URL and Branch. Never put a password in the URL.
- Click Save. For git, click Sync now, and Sign in if asked.
On the command line
pathwarden history storage set --git https://git.example.com/sec/pathwarden-state.git --branch mainMore: History storage.
Use environments
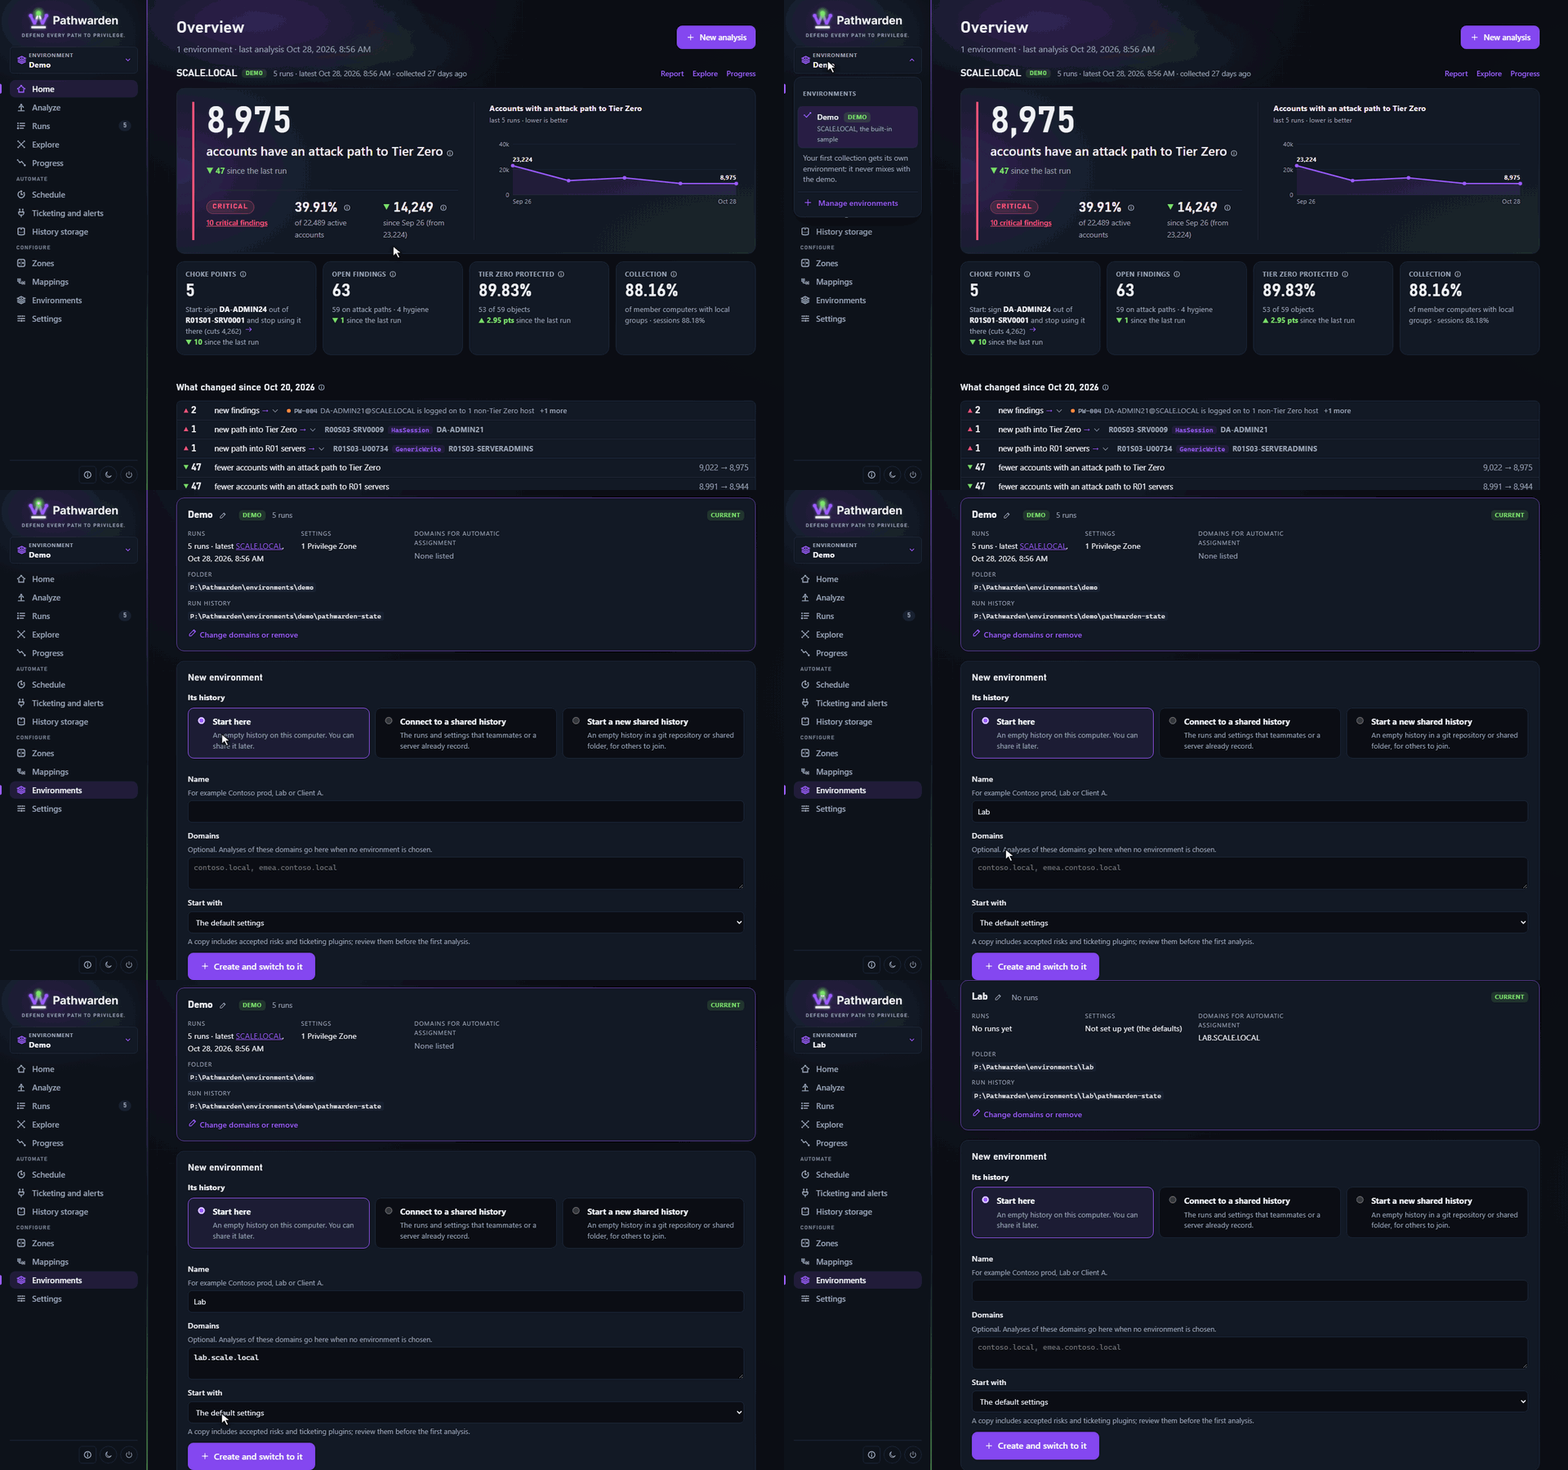
In the app
- Open the environment menu at the top of the rail, and click an environment to switch.
- To add one, under New environment, choose Its history, type the Name and the Domains, and click Create and switch to it.
On the command line
pathwarden env create "Lab" --domains "lab.scale.local" --use--env NAME on any command uses that environment.
More: Environments.
Add OpenGraph or AzureHound data
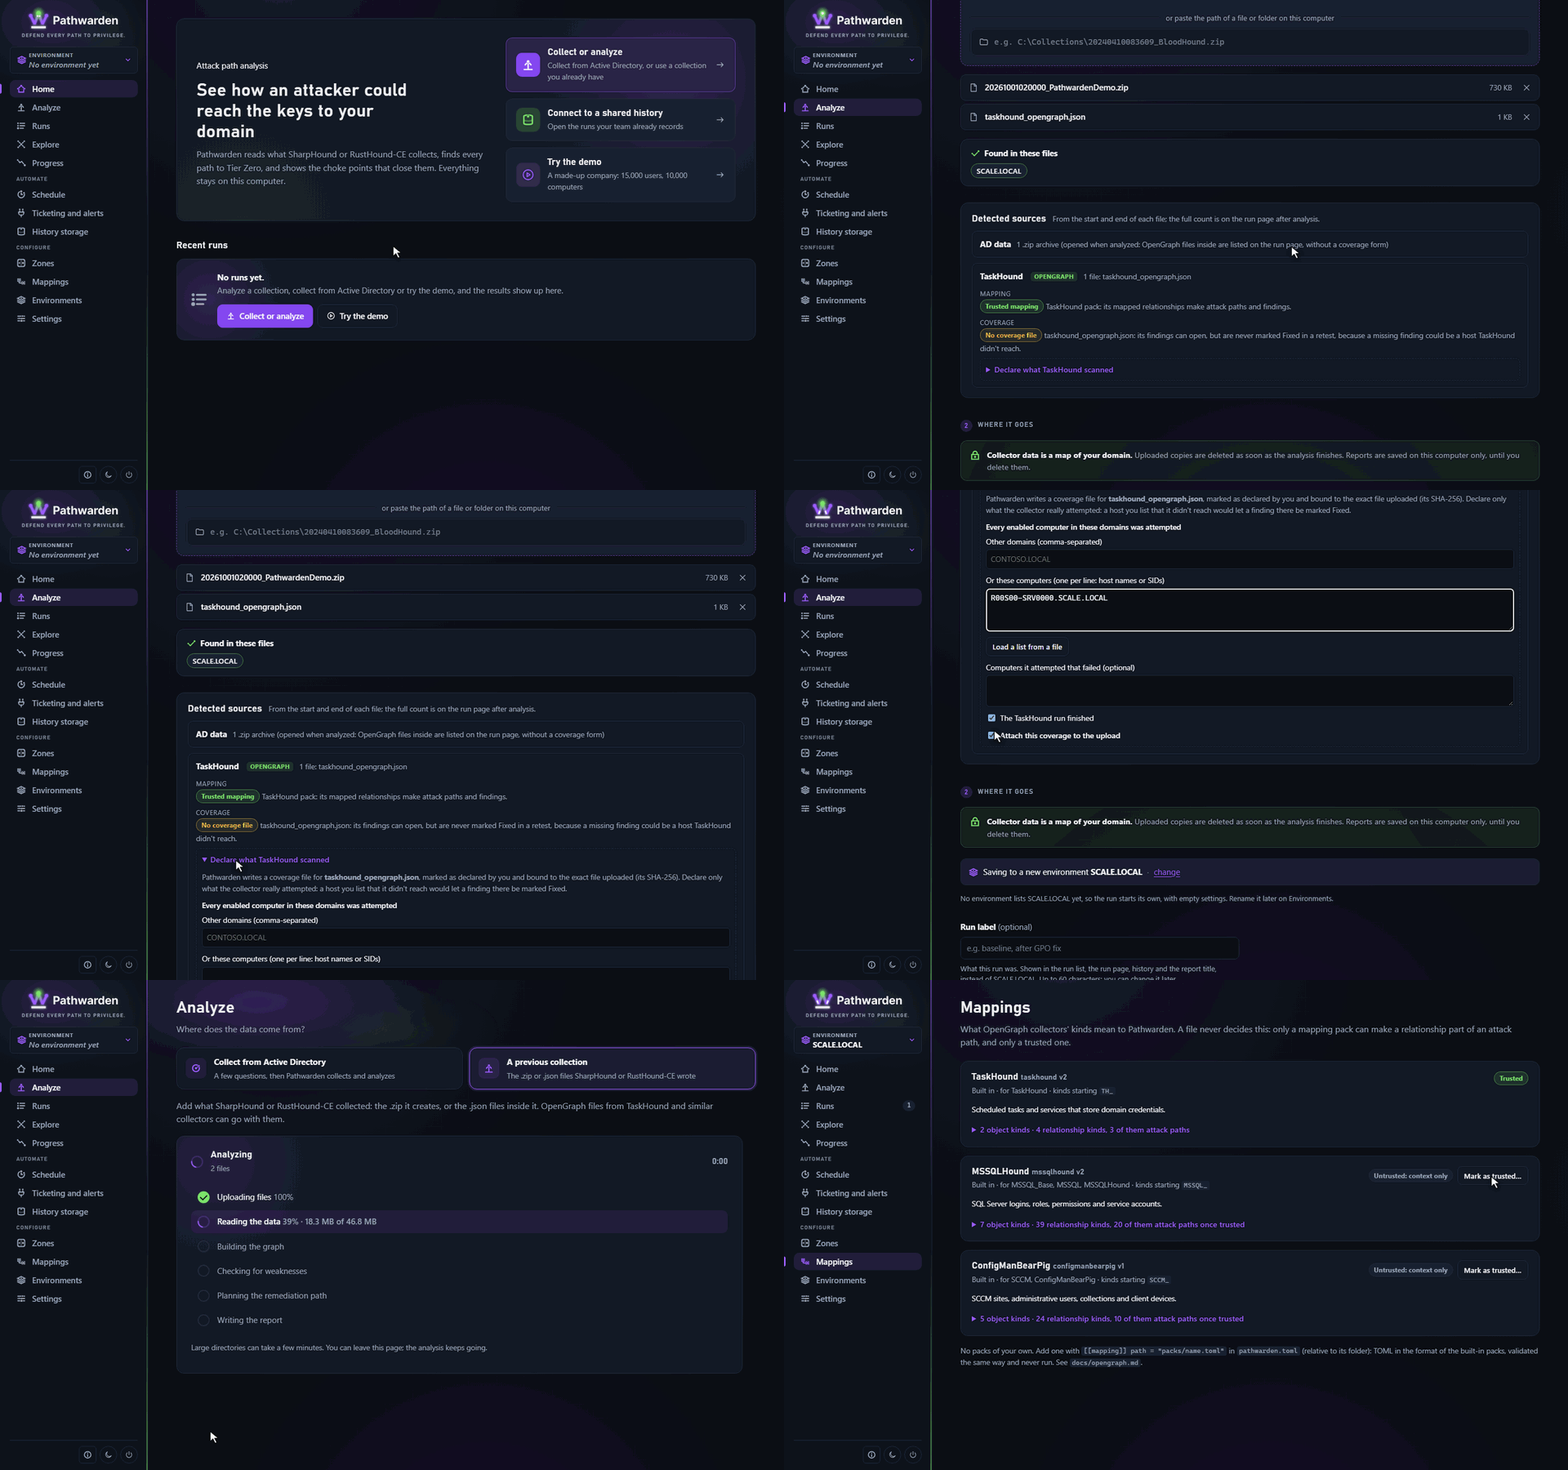
In the app
- In the rail, click Analyze, then A previous collection.
- Add the AD collection and the OpenGraph or AzureHound files together.
- Check Detected sources, then click Start analysis.
On the command line
pathwarden report -i corp-sharphound.zip -i taskhound_opengraph.json -i azurehound.json -o report.htmlMore: OpenGraph data, Entra ID.
Build an evidence pack
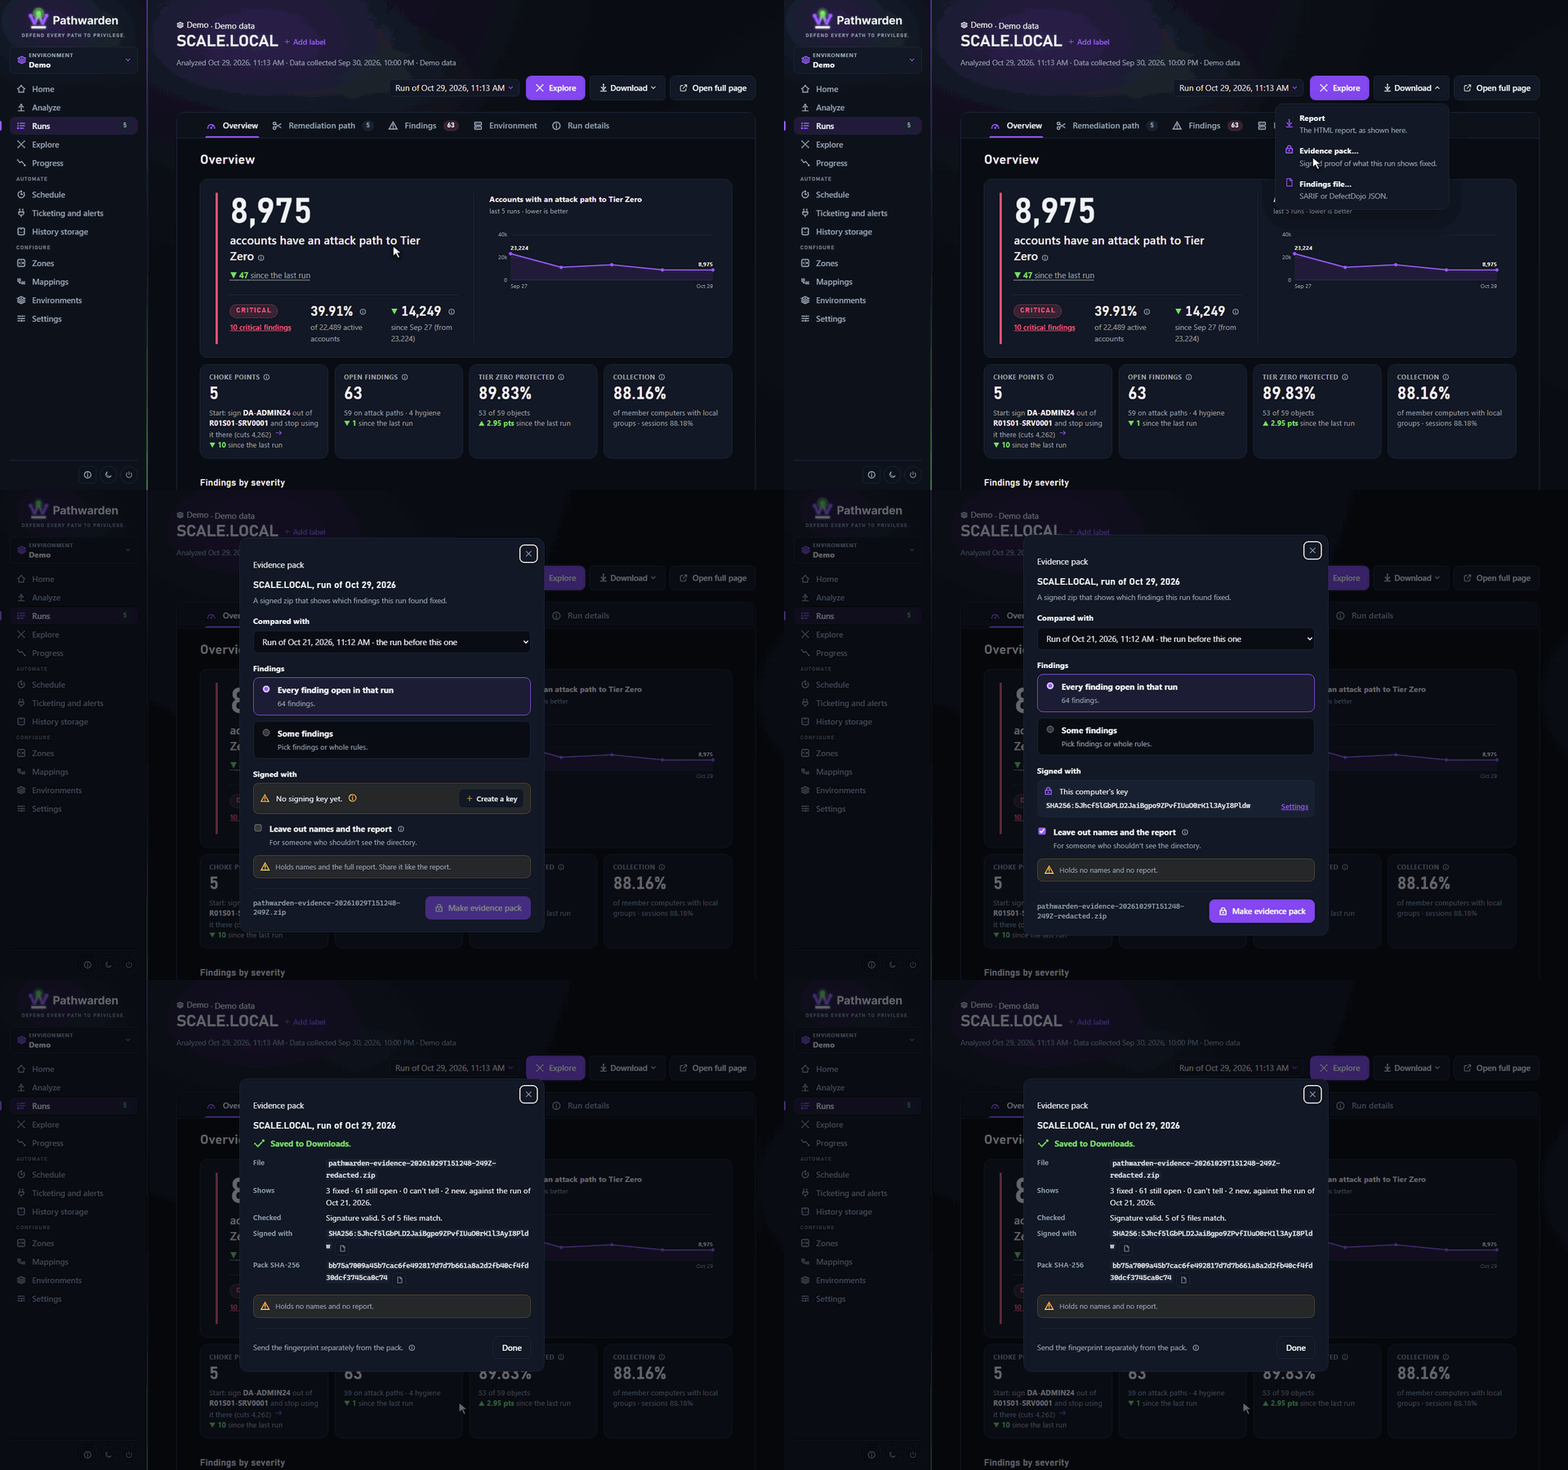
In the app
- On a run page, open Download and choose Evidence pack….
- Under Compared with, pick the earlier run.
- The first time, click Create a key.
- Click Make evidence pack.
On the command line
pathwarden evidence key new
pathwarden evidence --run 20261027-191300-a1b2c3 --env Lab
More: Evidence packs.
Export findings
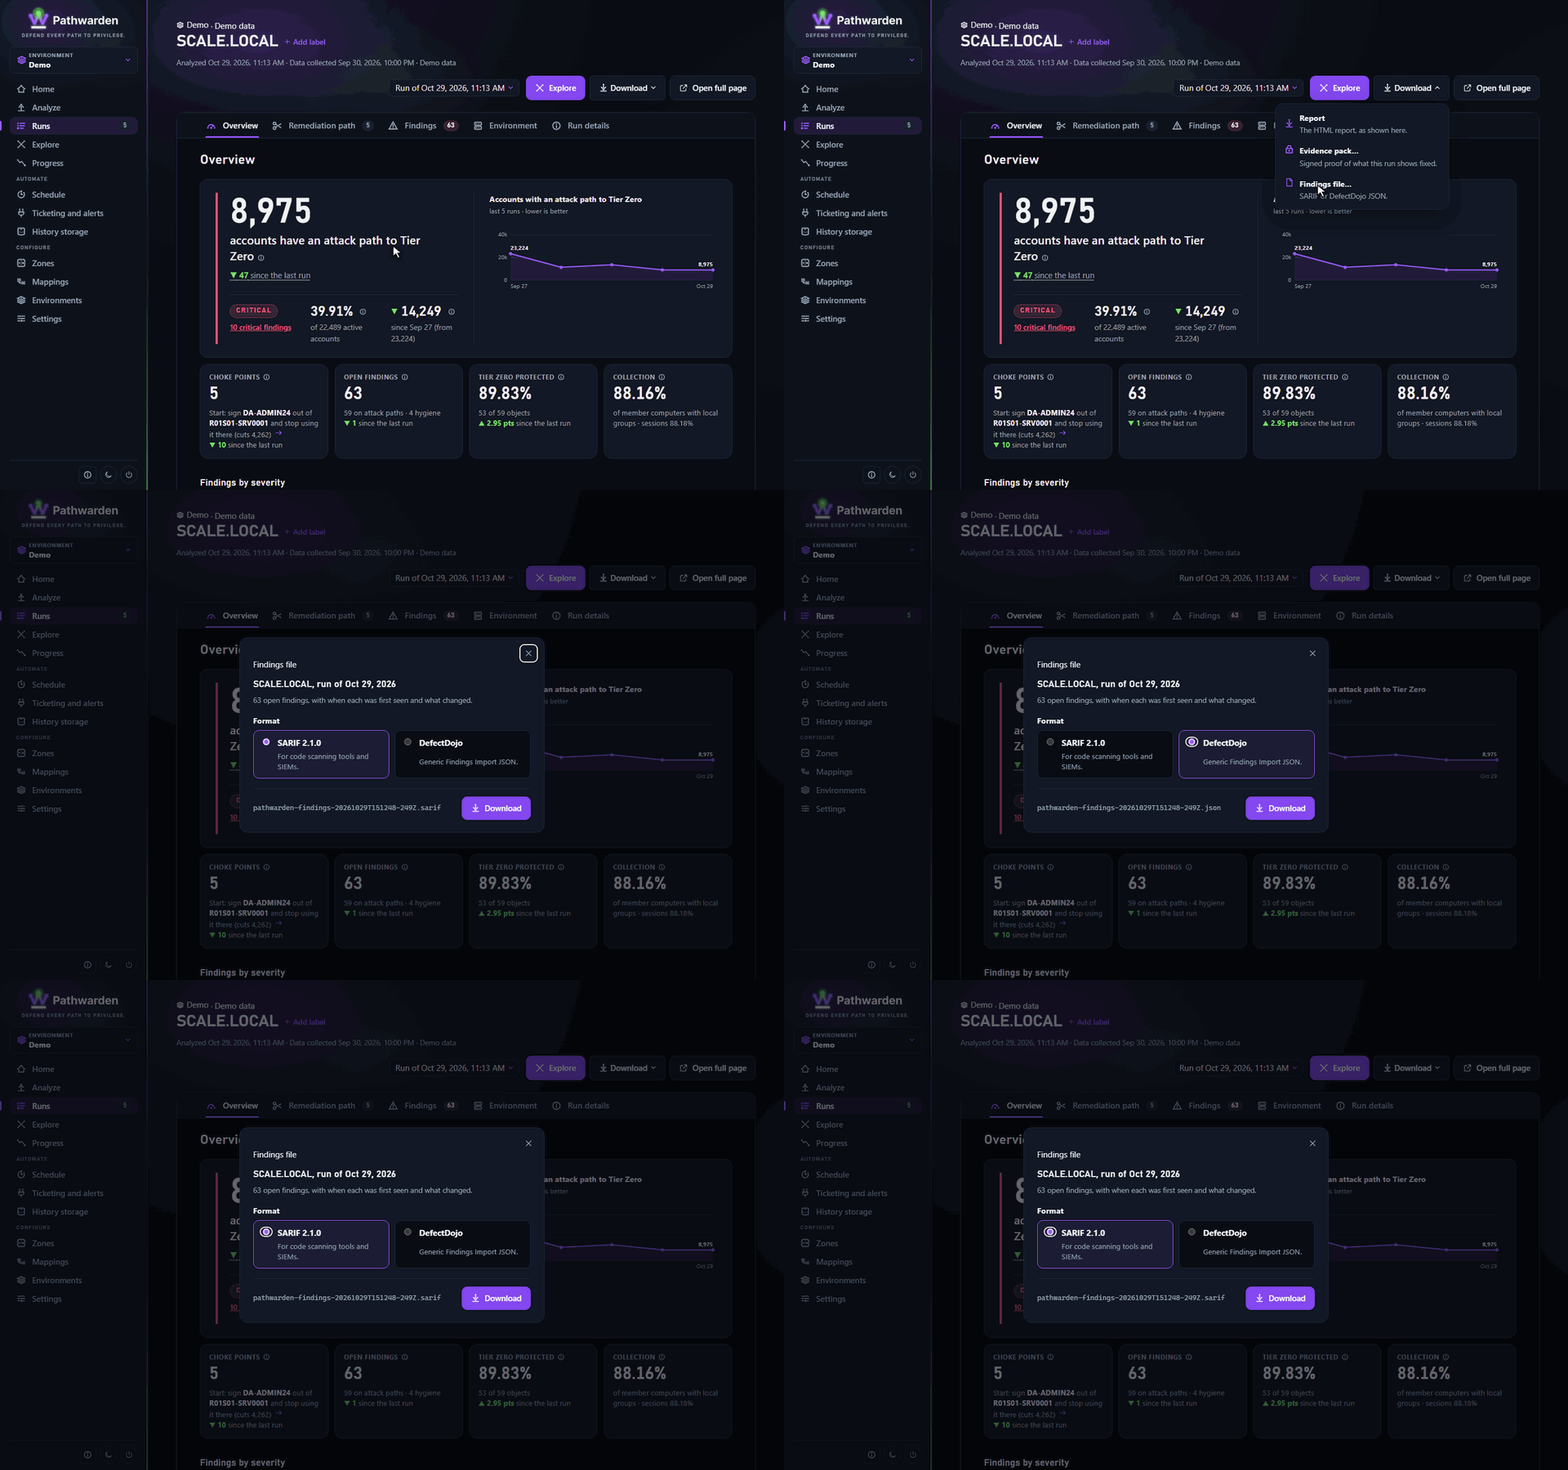
In the app
- On a run page, open Download and choose Findings file….
- Pick SARIF 2.1.0 or DefectDojo.
- Click Download.
On the command line
pathwarden export sarif --run 20261027-191300-a1b2c3 --env Lab -o findings.sarifMore: Integrations.
Generated from docs/tasks.md in the Pathwarden repository, version 1.0.0-rc.1.